Embedded Teachable Machine
Project intro
Project summary
The Embedded Teachable Machine allows you to quickly and interactively train a computer vision system to recognize objects simply by offering up examples to a camera and pressing one of four buttons to select the classification.
As in previous incarnations of "Teachable Machine" (from Creative Lab and Tensorflow.js notebook), this project demonstrates the abstractive power of deep neural networks: Using a small number of training samples, Teachable Machine can distinguish objects somewhat independent of their exact orientation, distance, lighting angle, etc.
Until recently, this type of machine learning couldn't even be achieved with a powerful GPU. Then the original Teachable Machine project proved it could be done with an ordinary desktop computer. Now, as shown in this project, we can perform real-time training for new classifications on a small embedded device with low power consumption, by leveraging the Coral USB Accelerator connected to a Raspberry Pi. The button-based UI is intuitive and rewarding, and the embedded device responds quickly.
How it works
The Teachable Machine relies on a pretrained image recognition network called MobileNet. This network has been trained to recognize 1,000 objects (such as cats, dogs, cars, fruit, and birds). During the learning process, the network has developed a semantic representation of each image that is maximally useful in distinguishing among classes. This internal representation can be used to quickly learn how to identify a class (an object) the network has never seen before—this is essentially a form of transfer learning.
The Teachable Machine uses a "headless" MobileNet, in which the last layer (which makes the final decision on the 1,000 training classes) has been removed, exposing the output vector of the layer before. The Teachable Machine treats this output vector as a generic descriptor for a given camera image, called an embedding vector. This approach is based on the idea that semantically similar images also give similar embedding vectors. Therefore, to make a classification, the Teachable Machine can simply find the closest embedding vector of something it's previously seen, and use that to determine what the image is showing now.
Each time the user presses a button, the algorithm stores the embedding vector and its associated class (1 - 4) in a dictionary. Then, new objects' embedding vectors can be compared to the library of saved embeddings, and a simple classification can be achieved by finding the closest correspondence.
More details about the algorithm can be found in this detailed post. This project is a direct re-implementation of Creative Lab's original Teachable Machine.
What you'll do in this tutorial
- Assemble the device
- Run the code and teach it to recognize some objects
- Discuss extensions you can implement yourself
- Take a detailed look at the code
What you'll need
Computer hardware
The most important device you need is the Coral USB Accelerator, which is available from several online sellers. You also need a Raspberry Pi, camera, and SD card, which are available from various retailers (links below are for Mouser.com).
| Description | Buy link (part number) |
|---|---|
| Coral USB Accelerator | Buy here |
| Raspberry Pi 3 (or Pi 4) | RPI3-MODBP-BULK |
| Raspberry Pi Power Supply | 1101001000045 |
| Raspberry Pi Camera | 485-3099 |
| 8GB micro SD CARD | SDSDQAB-008G |
Button circuit hardware for headless version
The "headless version" of this project is the primary design that uses wired buttons and LEDs to
interact with the Teachable Machine program. However, this button circuit is not required and you
can instead run the "keyboard version" that operates the program using your computer
keyboard: Simply pass the --keyboard flag when you run teachable.py (you should still follow the
setup procedure to setup your Coral hardware and software).
The suggested parts below for building the headless version are all available from Mouser.com, however they can be easily replaced by equivalent parts if you already have some in your toolbox. If you don't wish to build the hardware version, you can simply use your keyboard and screen to operate this project.
| Description | Buy link (part number) |
|---|---|
| Solderless Breadboard | 424-240-131 |
| Jumper Wires | 854-ZW-MF-10 |
| Hook-up wire | 424-WIRE-KIT |
| Pushbutton set | 474-COM-10302 |
| LED, 10mm, Red | 696-LLX100133SRD/D |
| LED, 10mm, Green | 696-SSL-LX100133SUGD |
| LED, 10mm, Blue | 696-LX100133USBD |
| LED, 10mm, Yellow | 696-SSLLX100133SYD |
| 4x 330 Ohm resistor | Mouser CFR-25JT-52-330R |
Acrylic base plate hardware (optional)
The acrylic base plate is an optional upgrade that makes your Teachable Machine organized and portable. Building the version shown here requires a laser cutter, but you can easily create a base plate using other materials (plywood, cardboard).
| Description | Buy link (part number) |
|---|---|
| Laser-cut acrylic base | Stock material: 12x12
inch 3mm acrylic CAD file: .dxf or .svg or .stl |
| 8x 4-40 x ⅝" screw or M2.5x16mm | 94735A723 |
| 8x 4-40 nut or M2.5 nut | 94812A200 |
| 4x 4-40 x 11/32" Spacers/Standoffs or equivalent | 90176A109 |
| 4x 2-56 x 5/16 screw or M2x8mm | 94735A708 |
| 4x 2-56 nut or M2 | 94812A100 |
| 4x Rubber feet | B07DQT3D5G |
Recommended tools
- Phillips screwdriver
- Pliers
- Clippers for trimming legs of LEDs/resistors
- A screen with an HDMI cable
- A keyboard with a USB-A connector.
- A USB-A mouse
How to build it
Time required:
- Over 2 hours for the headless version, building the base plate and assembling the breadboard circuit.
- About 30 minutes for the keyboard version (simply run it on your computer, without any button and LED wiring—skip to step 2).
Step 1: Assemble the components and base plate
First, you need to connect the USB Accelerator and Pi Camera to the Raspberry Pi. Using a base plate provides a convenient way to hold all the parts in place, which makes your project easily movable.
If you don't have access to a laser cutter or a 3D printer, you can create the base plate out of a different material, such as plywood or cardboard, or skip the steps related to the base plate and simply connect the USB Accelerator and Pi Camera to the Raspberry Pi on a flat surface.
1.1: Cut the acrylic base
Use the provided CAD files
(.dxf or .svg) to cut an acrylic plate out of 3mm clear acrylic. You can
also 3D-print a plate using the supplied .stl file.
After cutting, peel off the protective foil.
1.2: Attach the Coral USB Accelerator
Use 4 of the larger 4-40 screws and 4 of the 4-40 nuts.
Make sure the USB-C port points away from the edge, not towards the edge of the base plate.
1.3: Attach the Raspberry Pi to the base plate
Use 4 of the larger 4-40 screws and 4 of the 4-40 nuts as well as 4 of the spacers.
Getting all the screws in can be a little tricky: Hold the Pi and the plate vertically so the screws don't fall out.
1.4: Attach the camera
If the ribbon cable is not already attached to the camera, attach it now: Open the black latch, slide the cable in and close the latch (the wire connectors should point toward the camera board from the back). The cable edge should be perfectly straight.
Now screw in the camera (pointing upwards) to the mounting holes at the top left corner of the mounting board. You'll need the 2-56 x 5/16 screws and the 2-56 nuts. The cutout in the acrylic base plate should nicely accommodate the bulky parts on the back of the camera board.
1.5: Attach the camera to the Raspberry Pi
The camera is attached to the Raspberry Pi using the flat cable. Open the black latch on the Raspberry Pi by pulling on it gently. Insert the cable straight with the metal contacts facing away from the network port. You must insert it very straight.
Close the black latch.
1.6: Connect the Coral USB Accelerator to the Raspberry Pi
Plug in the USB Accelerator using the white USB-A to USB-C connector. Tuck it neatly under the Raspberry Pi as shown.
Step 2: Setup the Raspberry Pi
To install Raspbian on your SD card, choose one of the following options:
- If you already have a Raspberry Pi system that's set up to your liking, you can use that and skip to Step 3.
- Download a prebuilt image that has Teachable Machine already installed, write the image to your SD card, and then skip to Step 5. (Fastest option if you're new to Raspberry Pi.)
- If you don't have a monitor and keyboard, and you have access to your router, you can use a headless setup over SSH and then skip to Step 3.
- Otherwise, proceed with the following steps to setup the Raspberry Pi system from scratch.
2.1: Using your computer, create a clean Raspbian image on your SD card
Install a fresh Raspbian system on the SD card by following these instructions from Raspberry Pi. For this project, a minimal (terminal-only) Raspbian-stretch system is sufficient, but you can also use the full graphical system. We recommend installing the latest version.
2.2: Get the Raspberry Pi setup with Wi-Fi and (optionally) SSH
- Plug the SD card into the slot on the Raspberry Pi.
- Plug the monitor into the HDMI slot and a keyboard into the USB port.
- Connect the micro-USB power cable from the Raspberry Pi to a USB charger (must be at least 2.6A).
The Pi should boot up and you will be given a login prompt. The default username is "pi" and the password is "raspberry".
If you installed a full graphical system and you find yourself in a graphical environment, plug in the mouse and open a terminal.
To set up the Raspberry Pi, enter the following into the terminal:
sudo raspi-config2.3: Change your password
It is good practice to change the password after the first login, especially if you plan to enable SSH (see next step).
- Navigate to and select Change User Password.
- Enter your new password.
2.4: Enable Wi-Fi
- Select Network Options.
- Navigate to and select WiFi.
- Select your country.
- Select OK.
- Enter the SSID (the name) of your Wi-Fi network.
- Enter the password (or press Enter for no password).
2.5: Change the keyboard layout to your country (optional)
- Select Localization Options.
- Select Keyboard Layout.
- Select Generic 105-key (Intl) PC or choose the layout that most closely matches your keyboard layout.
- Select your country (you may have to choose Other first to display more options). For example, for the US choose English US.
- Select The default for the keyboard Layout and No compose screen on the next screen.
2.6: Enable the camera
- Select Interfacing Options.
- Navigate to and select Camera.
- Choose Yes.
- Select OK.
2.7: Enable SSH (optional)
Some people prefer to use SSH to work on the Pi. In that case do this step:
- Select Interfacing Options.
- Navigate to and select SSH.
- Choose Yes.
- Select OK.
ifconfig to get the IP address the router assigned to
the Pi under wlan0. You can use that to SSH into the Pi from your computer.
2.8: Finish the raspi-config setup
- Choose Finish.
- When prompted whether to reboot, select Yes.
Step 3: Update and install the Edge TPU Library
Now that you have the Raspberry Pi basic configuration done, you just need some updates to support the Coral USB Accelerator.
3.1: Boot the Pi and update the image
Boot the Pi up if it's not already running and in a terminal, update the image and install any dependencies:
sudo apt-get update3.2: Reboot the Pi
Reboot the Pi by entering the following:
sudo reboot3.3: Ensure that the camera is now working correctly
Once it reboots, capture a photo with this command:
raspistill -v -o test.jpgYou should see a camera image displayed for about 5 seconds and then it will write a file called
test.jpg.
3.4: Install the Edge TPU library
sudo apt-get install python3-pycoral.
Install the Edge TPU Python library:
sudo apt-get install libedgetpu1-legacy-std python3-edgetpuMake sure the Edge TPU library is installed by running this command:
python3 -c 'import edgetpu; print("OK")'This command should only print "OK". If you receive any errors, make sure the previous step completed successfully.
Step 4: Install Teachable Machine
Now you just need the Teachable Machine project code.
4.1: Download the Teachable Machine source code
Enter the following commands on the Raspberry Pi:
cd /home/pi

git clone https://github.com/google-coral/project-teachable.git

cd project-teachable

sh install_requirements.sh
4.2: Reboot
Reboot for changes to take effect.
sudo rebootStep 5: Build the circuit
Assemble the circuit in the following order, or else you might find it difficult to fit the resistors in between the large buttons.
--keyboard flag when you run teachable.py.
5.1: Insert wire connectors
Start by putting the wire connectors into their respective positions.
5.2: Place resistors
Next put in the resistors.
Trim the resistor legs using the clippers/pliers so that they sit flat on or just a little above the breadboard.
5.3: Add the buttons
The color ordering does not matter, but the white button must be last because it's the only button that does not have a colored LED.
5.4: Add the LEDs
Match the LED colors to the button colors.
As with the resistors we recommend trimming the LED legs, but be careful to get the polarity of the LEDs right. Before you trim them, notice which leg is shorter, which is the negative side.
The negative side connects to the resistor, while the positive side connects to the button's positive rail.
If you forget the polarity, it's easy to fix later with trial and error.
5.5: Attach the jumper cables
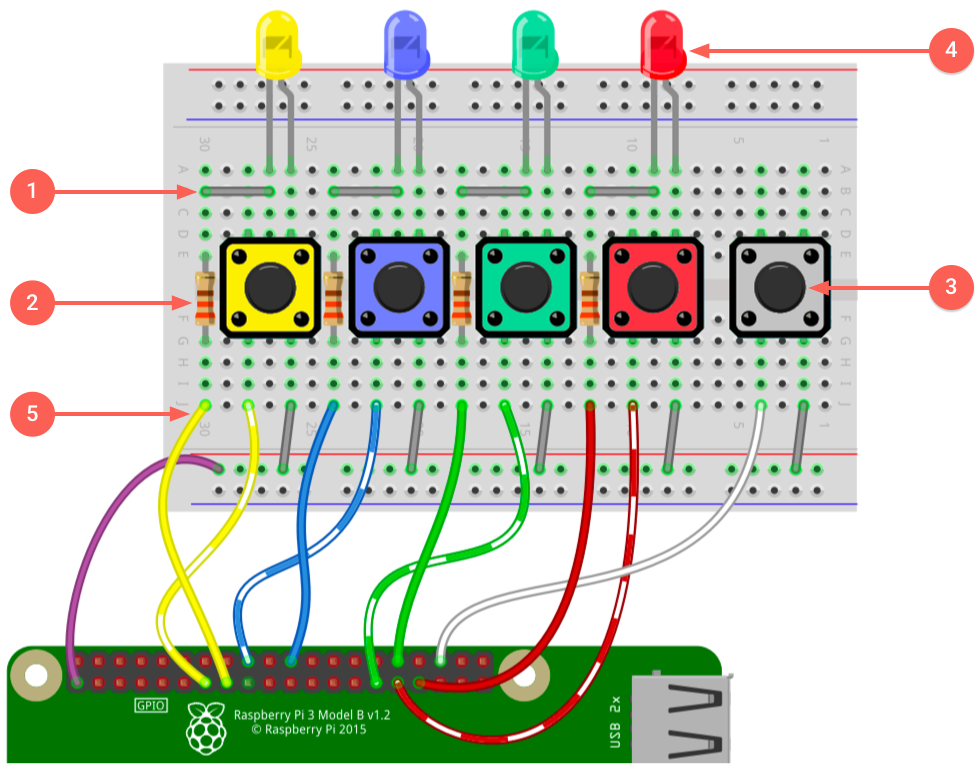
Attach one side of each jumper wires to the breadboard as shown in figure 1.
The exact colors of the wires doesn't matter; only the placement does.
5.6: Attach the breadboard
The breadboard has foil on the back; peel it off and stick the board to the acrylic plate, between camera and USB Accelerator.
Be sure the jumper wires are on the side closest to the Raspberry Pi.
5.7: Connect the wire harnesses and the button leads
Before you start attaching leads to the Raspberry Pi, turn it off by entering the following in the Raspberry Pi terminal:
sudo shutdown -h nowWait a few seconds, and then unplug the power.
Now follow the wiring diagram from figure 1 to connect wires to the Raspberry Pi.
(You may temporarily unplug the camera ribbon cable if it's in the way.)
5.8 Remember to peel off the camera protector foil.
The hardware is now assembled and should look like this:
Step 6: Test the button and LED wiring
Time to run some code! But don't power it on yet.
First, visually double check all the wiring.
If the wiring looks good, plug in the Raspberry Pi and log in. On the Pi, go to the
~/project-teachable directory and test the buttons and LEDs:
cd ~/project-teachable

python3 teachable.py --testui
If everything is correctly wired, then when you press a colored button, the corresponding LED lights up. On the screen, you should also see a message that says which button was pressed.
If any of the LEDs don't light up, power off the board and carefully review the wiring in figure 1.
How to use it
Teach the machine
To operate your Teachable Machine, start the program as follows:
cd ~/project-teachable

python3 teachable.py--keyboard flag.
After you start the code you should see the four colored LEDs ripple a few times and then turn off.
In the terminal, it will say something like fps 30.2; #examples: 0; Class --.
Now you need to teach the machine to recognize some new objects, so start adding class examples as follows.
-
First reserve one of the classes for "background." So pick one of the colored buttons to represent "background" and press that button while nothing of interest is in front of the camera (the camera should simply see your ceiling). You can use any button except for white (that button clears all the learned classes).
-
Now hold an item in front of the camera and press one of the other colored buttons. This saves a snapshot of the image's embedding, linked to the button that was pressed.
Rotate the object orientation slightly and press the button again. Repeat this a few times to gather training data.
For example, hold an apple in various orientations and distances, pressing the same button each time. Do not hold down the button; instead press it multiple times while holding the object still. (The example counter on the screen should go up every time you press the button.)
-
Hold a different object in front of the camera and press another colored button, repeating the process to capture multiple images.
-
Repeat the training for the fourth and final button.
Note: This project allows for only three objects to be learned—the fourth color is reserved for "background". However, the Teachable Machine code has no limit to how many objects it can learn; the limit is determined only by the number of buttons/LEDs you have (or whatever other UI you might create).
Now hold one of the three objects in front of the camera (without pressing a button). You should see the correct LED light up, indicating that it recognized and classified the object. When no object is shown, the "background" LED should light up instead.
If you find that an object is misclassified, hold the object still and press the correct button again to help train it further. It's easy to get a sense of whether enough examples have been added, or where more examples may be needed.
To clear the memory, press the white button. All four colored buttons should return to "off" and the example counter should be 0 again.
That's it!
Troubleshooting
-
If you get the error:
Failed to get TPU context, try unplugging and replugging your USB Accelerator. This is often necessary right after installing the software for the first time. -
If you see the message:
Cannot identify device ‘/etc/video0' then the bcm2835-v4l2  module
isn't loaded
, try runningsudo modprobe bcm2835-v4l2. Or better yet, addbcm2835-v4l2to the end of/etc/modulesand reboot. -
If you have trouble getting good results, your camera might not be able to see the objects clearly due to poor lighting. If the overhead lighting is too bright, the contrast the camera sees may be to high, causing the images to appear only as silhouettes. In that case, add some upward lighting, set the demo on its side, or shield the glare from above.
Training ideas
Classification using embeddings has its limits, but for simple classification tasks it works surprisingly well. Experiment with different objects, preferably with a static background. Try with:
- Hands at different heights
- Holding out different numbers of fingers (1, 2, 3)
- Fruit
- Chess pieces
- Faces (it's surprisingly good at this)
Start it upon boot
Now that everything works, you can optionally make the program start at power up without your
monitor and keyboard. To do so, simply open the /etc/rc.local file and add the following two lines
at the end, right before exit 0:
cd /home/pi/project-teachable
su pi run.sh &
Now reboot your machine. The program should start right after bootup. Now you can take your Teachable Machine anywhere.
Try the weight imprinting method
By default, Teachable Machine uses a k-nearest neighbors algorithm to
perform on-device transfer-learning on a pre-trained network. Since we first released this project,
the Coral team has released a new API called
ImprintingEngine that also performs
transfer-learning on a pre-trained network, but using a different technique called weight
imprinting. So we've updated this project so you can instead run it using weight imprinting, by
passing a couple parameters:
python3 teachable.py --method 'imprinting' \
  --model 'models/mobilenet_v1_1.0_224_l2norm_quant_edgetpu.tflite'
Depending on your situation, either the k-nearest neighbors algorithm or the weight imprinting API might work better for you. So it’s worth experimenting with both. Just beware that the model passed for weight imprinting is a specially-designed model, so you can't change that to any ordinary classification model.
For more information about how the weight imprinting API works, read Retrain a classification model on-device with weight imprinting.
Extending the project
The Teachable Machine is just a starting point and you can adapt it for a variety of uses.
The k-nearest neighbors algorithm applied to an embedding layer of a pretrained network is a simple yet powerful way to perform fast, on-device transfer learning without the need to fully retrain the network. It leverages the fact that neural networks learn general purpose abstractions in their intermediate layers, which are not specific to the exact images and classes they were trained on.
The advantage is that rather than extensively retraining the network on thousands of images, you can directly teach the device as needed. When it gets an identification wrong, you can add another training datapoint on the fly. The disadvantage is that it is somewhat less accurate. So for very high precision tasks, you cannot avoid true retraining, but in many cases working with embeddings can get you most of the way there.
As it is, the device is just a shell lacking a true output (other than the LED). Think of ways the machine could indicate or communicate recognition of objects. In software, you have a variety of options. For example, your Teachable Machine could play sounds, or send a tweet, email, or some other form of notification. You could try teaching it to recognize you and your friends.
You could also log data and serve the log using a simple Python web server. This way, you could get stats or graphs of object recognition over time. Who empties the dishwasher more often?
Finally, you can also trigger hardware events by using the same GPIO pins that make the LEDs light up to trigger other events. For example, a transistor could trigger a relay which could turn on another device. Perhaps the device could greet different people. Or the reading light could switch on when a book is placed in view. Or perhaps you want the sprinkler to chase away the cats (and only the cats) from your kid's sandbox.
How it actually works
In this section, we'll describe the code used in teachable.py
so you can learn to do it yourself for your own projects.
First, read this Tensorflow.js tutorial , which goes into the details of the Teachable machine algorithm, and familiarize yourself with what an embedding vector is and how you can use it to find similarities between images on a semantic level rather than on a pixel-by-pixel level. Armed with that knowledge, you can now focus on how this project is implemented for the Edge TPU.
Principally, the code needs to accomplish the following:
- Grab an image frame from the camera.
- Send it through the neural network and get an embedding vector back.
- If a button was pressed, save the embedding vector and remember which button was used to save it.
- For every frame, find the nearest embeddings that were previously saved. Light up the button that corresponds to that embedding.
The following sections roughly describe the parts of code that accomplish these steps.
classify.py camera demo.User interface
The project has five buttons that act as our interface. As shown in the wiring diagram above, each button and LED has a GPIO pin assigned to it. The code just needs to set which pins correspond to which buttons and initialize the GPIOs.
The following UI_Raspberry class configures these pins and manages interactions with the UI.
Similar classes are also provided in teachable.py if you want to instead built the UI with a
keyboard or the Coral Dev Board.
class UI_Raspberry(UI):
  def __init__(self):
    # Only for RPi3: set GPIOs to pulldown
    global rpigpio
    import RPi.GPIO as rpigpio
    rpigpio.setmode(rpigpio.BCM)

    # Layout of GPIOs for Raspberry demo
    self._buttons = [16 , 6 , 5 , 24, 27]
    self._LEDs = [20, 13, 12, 25, 22]

    # Initialize them all
    for pin in self._buttons:
      rpigpio.setup(pin, rpigpio.IN, pull_up_down=rpigpio.PUD_DOWN)
    for pin in self._LEDs:
      rpigpio.setup(pin, rpigpio.OUT)
    super(UI_Raspberry, self).__init__()
We can now easily set an LED to "on" or "off" or read the state of a particular button:
  def setLED(self, index, state):
    return rpigpio.output(self._LEDs[index],
           rpigpio.LOW if state else rpigpio.HIGH)

  def getButtonState(self):
    return [rpigpio.input(button) for button in self._buttons]
K-nearest neighbors
What we need to do now is to send the camera image through the neural network and get an embedding
vector back. We are using a special model which does not have the final classification layer. The
full code for this part of the project is in embedding.py. Let's look at some of the most critical
parts.
First we need to feed an image and extract the embedding vector at the top of the network. To do so
we derive a new class from BasicEngine.
class EmbeddingEngine(BasicEngine):
  """Engine used to obtain embeddings from headless mobilenets."""
This function will take an image (as a PIL Image
) and return a vector of size
1024 as a numpy array
of type np.float32. This is our embedding vector.
def DetectWithImage(self, img):
    input_tensor_shape = self.get_input_tensor_shape()
    if (input_tensor_shape.size != 4 or input_tensor_shape[3] != 3 or
        input_tensor_shape[0] != 1):
      raise RuntimeError(
          'Invalid input tensor shape! Expected: [1, width, height, 3]')
    required_image_size = (input_tensor_shape[1], input_tensor_shape[2])
    with img.resize(required_image_size, Image.NEAREST) as resized_img:
      input_tensor = np.asarray(resized_img).flatten()
      return self.RunInference(input_tensor)[1]
To run the k-nearest neighbor comparison, we need to manage a library of saved embeddings and save new embeddings to it when the user presses a button. To do that, we derive another class that is specific to working with k-nearest neighbor embeddings.
class kNNEmbeddingEngine(EmbeddingEngine):
  """Extends embedding engine to also provide kNearest Neighbor detection."""
Next is our function that takes a new embedding and an arbitrary label and saves it in memory. For faster execution later, we pre-normalize each vector before saving it. We call this function every time a button is pressed.
def addEmbedding(self, emb, label):
    normal = emb/np.sqrt((emb**2).sum())  ## Normalize
    self._embedding_map[label].append(normal)  ## Save in our library
Later, we will need all the embeddings as a big matrix to calculate all the cosine distances,
so we create that matrix now to avoid having to make it on every query
(cosine distance is explained in the blog post on
Teachable Machine in Tensorflow.js). The logic here is
complicated by the fact that we need to expand each set of labeled embedding vectors to at least
self._kNN vectors, otherwise the majority vote at the end isn't fair (if you have only one example
of class A but three examples of class B and kNN=3, then B will always win no matter how close
the query vector is to the one example of A).
    emb_blocks = [] # Each block encompasses all the embeddings for each label
    self._labels = []
    # Expand labelled blocks of embeddings for when we have less than kNN examples.
    # Otherwise blocks that have more examples unfairly win.
    for label, embeds in self._embedding_map.items():
      emb_block = np.stack(embeds)
      # If block is smaller than kNN, just pad up to kNN by duplicating the vectors.
      if emb_block.shape[0] < self._kNN:
          emb_block = np.pad(emb_block, [(0,self._kNN - emb_block.shape[0]), (0,0)], mode="reflect")
      emb_blocks.append(emb_block)
      self._labels.extend([label]*emb_block.shape[0])
    self._embeddings = np.concatenate(emb_blocks, axis=0) # Save the full matrix
Now we need to calculate the cosine distance of a query vector to every one of the stored vectors. Conveniently, we already have all those stored in a big matrix and they're already normalized. So to calculate, all we need to do is to normalize the query vector and do a matrix multiplication. You can find more on the math behind this in this blog post on the Teachable Machine in Tensorflow.js.
def kNNEmbedding(self, query_emb):
    if self._embeddings is None: return None
    query_emb = query_emb/np.sqrt((query_emb**2).sum())  # Normalize
    dists = np.matmul(self._embeddings, query_emb,)      # Calculate distances
Now we have a vector of cosine distances (dists) and a list of corresponding labels (saved in
self._labels[i]). We need to find the largest distances (cosine distances are larger when the
items are closer up to 1.0 when they're are identical). This is achieved in the next line:
    kNN = min(len(dists), self._kNN)       # How many largest distances to find
    n_argmax = np.argpartition(dists, -kNN)[-kNN:]  # Get the largest kNN distances
n_argmax now contains the indices of the largest distances. But what we want are not the distances
themselves but the labels associated with those distances (corresponding to the respective latent
vectors). Thus, now we need to extract the corresponding labels for each of the indices.
labels = [self._labels[i] for i in n_argmax] # Get the labelsNow labels is a list. For example: [0,2,2,3,2] assuming kNN was 5, meaning the classes of the 5
nearest neighbors to our query were classes 0, 2, 2, 3 and 2 respectively. Finally, to get the
answer we seek using the k-nearest neighbor algorithm, we simply need to find the label that occurs
the most. In our case this would be class 2, as it occurs 3 times in our 5 nearest neighbors.
    most_common_label = Counter(labels).most_common(1)[0][0]  # Get the most common
    return most_common_label
Receive camera frames and put it all together
This part is easy because the
classify.py
demo already provides this. There is another file in
that demo called gstreamer.py that we use verbatim for our project. This code encapsulates all the
logic for talking to the camera and we can simply provide it with an arbitrary callback in which we
can handle each frame.
teachable = TeachableMachine(args.model, ui) # Instantiate our main class
def user_callback(img, overlay):
      return teachable.classify(img, overlay)
gstreamer.run_pipeline(user_callback) # Register callback
The main handler is defined in the TeachableMachine class. First we take the image and hand it to
our k-nearest neighbors class (self._engine) and add the classification to a buffer. We then
choose the final classification to display as a best-of-N in order to avoid rapid flickering in
border cases.
def classify(self, img, overlay):

    # Classify current image and determine
    emb = self._engine.DetectWithImage(img)
    self._buffer.append(self._engine.kNNEmbedding(emb))

    # The final classification is a best of average over the last few
    # classifications.
    classification = Counter(self._buffer).most_common(1)[0][0]
We then deal with the input UI. If a button is pressed we need to save that embedding. Note we use
the function self._ui.getDebouncedButtonState() which we didn't discuss above in detail, but it
basically ensures that pressing a button adds only a single example.
    # Interpret user button presses (if any)
    debounced_buttons = self._ui.getDebouncedButtonState()
    for i, b in enumerate(debounced_buttons):
      if not b: continue
      if i == 0: self._engine.clear() # Hitting button 0 resets
      else : self._engine.addEmbedding(emb, i) # otherwise the button # is the class
Finally we display the results to the screen and turn on respective LED.
    # Print/Display results
    self._ui.setOnlyLED(classification)
    classes = ['--', 'Red', 'Orange', 'Green', 'Blue']
    status = 'fps %.1f; #examples: %d; Class % 7s'%(
            fps, self._engine.exampleCount(),
            classes[classification or 0])
    print(status)
About the creator
Mike Tyka works with artificial neural networks as an artistic medium and tool. He created some of the first large-scale artworks using Iterative DeepDream and collaborated with Refik Anadol to create pioneering immersive projection installations using Generative Adversarial Networks called Archive Dreaming. Mike currently works on machine learning at Google in Seattle.
Is this content helpful?