Get started with the Dev Board Mini
This page shows you how to set up the Coral Dev Board Mini, a single-board computer that accelerates machine learning models with the on-board Edge TPU.
The board in your box is already flashed with Mendel Linux, so the setup simply requires connecting to the board's shell console and updating some software. Then we'll show you how to run a TensorFlow Lite model on the board. From there, you can try any of our other examples—perhaps connect a camera and run an object detection model, pose detection model, keyphrase detector, and more.
If you want to learn more about the hardware, see the Dev Board Mini datasheet.
For a "choose your own adventure" walk-through with the Dev Board Mini, check out the following video.
1: Gather requirements
To get started, be sure you have the following:
- A host computer running Linux (recommended) or Mac
- Python 3 installed
- One USB-C power supply (2 A / 5 V), such as a phone charger
- One USB-C to USB-A cable (to connect to your computer)
- An available Wi-Fi internet connection
Notice that this board is intended as a headless device. That is, you typically do not connect a keyboard and monitor, and use it as a desktop computer. So, this guide is focused on connecting to the board remotely with a secure shell terminal.
However, the Mendel OS does include a simple desktop with a terminal application. So if you prefer, you can connect a monitor to the micro-HDMI port, and connect a keyboard and mouse to the USB OTG port.
2: Install MDT
MDT is a command line tool for your host computer that helps you interact with the Dev Board Mini. For example, MDT can list connected devices, install Debian packages on the board, and open a shell terminal on the board.
You can install MDT on your host computer follows:
python3 -m pip install --user mendel-development-toolYou might see a warning that mdt was installed somewhere that's not in your PATH
environment variable. If so, be sure you add the given location to your PATH, as appropriate for
your operating system. If you're on Linux, you can add it like this:
echo 'export PATH="$PATH:$HOME/.local/bin"' >> ~/.bash_profile

source ~/.bash_profile
3: Plug in the board
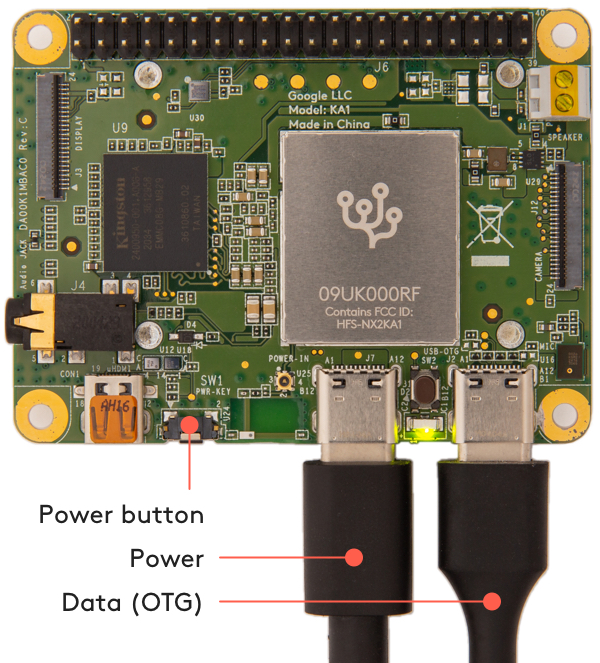
- Connect your power supply to the board's USB power plug (the left plug, as shown in figure 1) and connect it to an outlet.
- Connect your USB data cable to the other USB plug and to your host computer.
When you connect the USB cable to your computer, the board automatically boots up, and the board's LED turns green. It then takes 20-30 seconds for the system to boot up.
About the USB ports
Both USB ports can power the board, but they behave differently:
- USB power port (left): This port supports power input only (no data). If you connect only this port, you must firmly press the power button to boot the board. Once the board is booted, you can press the power button to safely shut it down.
- USB OTG port (right): This port supports power input and USB data (as host or device). If you connect power here, the board boots up automatically. If you press the power button, the board reboots—you cannot fully shut down the board when the OTG port is connected to power (even if you shut down the operating system, it will reboot).
So to safely power-off the board, you must deliver power with the power port only, and then you can toggle power with the power button. Whereas, if you want the board always on, deliver power with the OTG port, but beware that you then cannot safely power off the board unless you transition power to the power port.
For more information, see section 5.1 in the Dev Board Mini datasheet.
4: Connect to the board's shell via MDT
MDT provides an easy way to establish an SSH connection with the board over USB, as follows.
-
Make sure MDT can see your device by running this command from your host computer:
mdt devicesYou should see output showing your board hostname and IP address (your name will be different):
fun-zebra (192.168.100.2)If you don't see your device, it might be because the system is still booting up. Wait a moment and try again.
-
Now to open the device shell, run this command:
mdt shellAfter a moment, you should see the board's shell prompt, which looks like this:
mendel@fun-zebra:~$
Now you're in the board!
hostname).
For details about how the shell connection works and what else you can do with MDT, see the MDT documentation.
5: Connect to the internet
You'll need the board online to download system updates, TensorFlow models, and code examples.
-
Select a Wi-Fi network on the board. You can use one of two option:
-
Enter your network name and password with this command:
nmcli dev wifi connect <NETWORK_NAME> password <PASSWORD> ifname wlan0 -
Or use an interactive menu to select the network:
-
Launch the network manager menu:
nmtui -
Use your keyboard to select Activate a connection.
-
Select a network from the list, enter a password if required, and then quit the menu.
-
-
-
Verify your connection with this command:
nmcli connection showYou should see your selected network listed in the output. For example:
NAME                UUID                                  TYPE             DEVICE
MyNetworkName       61f5d6b2-5f52-4256-83ae-7f148546575a  wifi             wlan0
You might see other connections listed, such as the Ethernet-over-USB connection you're using for MDT.
mdt shell.
6: Update the Mendel software
Some of our software updates are delivered with Debian packages separate from the system image, so make sure you have the latest software by running the following commands in the board's shell terminal:
sudo apt-get update

sudo apt-get dist-upgrade

sudo reboot now
Reboot is required for some kernel changes to take effect.
sudo date +%Y%m%d -s "20210121". Then try to upgrade again.
When the board's LED turns green after reboot, it should be ready for login, so you can reconnect from your computer with MDT:
mdt shellNow you're ready to run a TensorFlow Lite model on the Edge TPU!
dist-upgrade command updates all system packages for your current Mendel
version. If you want to upgrade to a newer version of Mendel, you need to flash a new system image.
7: Run a model using the PyCoral API
To get you started, we've created some simple examples that demonstrate how to perform an inference on the Edge TPU using the TensorFlow Lite API (assisted by the PyCoral API).
Execute the following commands from the Dev Board Mini shell to run our image classification example:
-
Download the example code from GitHub:
mkdir coral && cd coral git clone https://github.com/google-coral/pycoral.git cd pycoral -
Download the model, labels, and bird photo:
bash examples/install_requirements.sh classify_image.py -
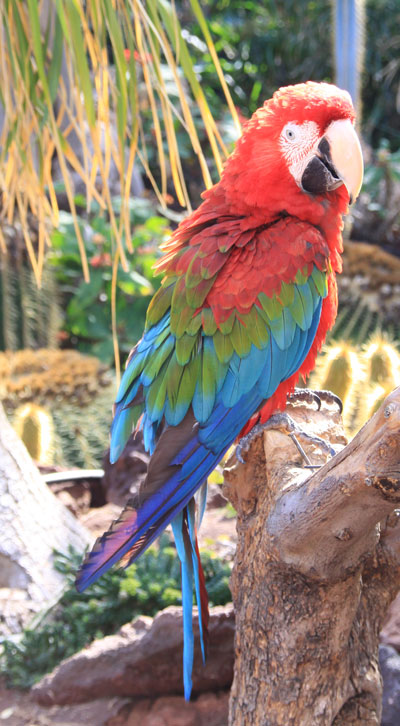
Run the image classifier with the bird photo (shown in figure 2):
python3 examples/classify_image.py \
--model test_data/mobilenet_v2_1.0_224_inat_bird_quant_edgetpu.tflite \
--labels test_data/inat_bird_labels.txt \
--input test_data/parrot.jpg
You should see results like this:
----INFERENCE TIME----
Note: The first inference on Edge TPU is slow because it includes loading the model into Edge TPU memory.
158.3ms
14.3ms
14.3ms
14.5ms
14.3ms
-------RESULTS--------
Ara macao (Scarlet Macaw): 0.75781
Congrats! You just performed an inference on the Edge TPU using TensorFlow Lite.
To demonstrate varying inference speeds, the example repeats the same inference five times. It prints the time to perform each inference and then the top classification result (the label name and the confidence score, from 0 to 1.0).
To learn more about how the code works, take a look at the classify_image.py source code and read our guide about how to run inference with TensorFlow Lite.
8: Safely shut down the board
You should shut down the Dev Board Mini as follows:
- Be sure the board is connected to power through the USB power port (see figure 1).
- Unplug the USB OTG cable (if connected). This is important, because if the OTG port is connected, the board will immediately reboot upon shutdown.
- Either press the board power button or run
sudo shutdown nowfrom the board terminal. - When the board's LED turns off, you can unplug the power supply.
Next steps
To run some other types of neural networks, check out our example projects, including examples that perform real-time object detection, pose estimation, keyphrase detection, on-device transfer learning, and more.
To run vision models using the Coral Camera, check out the camera setup guide, and our other camera examples.
If you want to train your own TensorFlow model for the Edge TPU, try these tutorials:
- Retrain an image classification model (MobileNet) (runs in Google Colab)
- Retrain an object detection model (EfficientDet) (runs in Google Colab)
- More model retraining tutorials are available on GitHub.
- Or to build your own model that's compatible with the Edge TPU, read TensorFlow Models on the Edge TPU
If you'd like to browse the Mendel source code and build it yourself for the Dev Board Mini, take a look at the Mendel Getting Started guide.
Is this content helpful?