Get started with the Dev Board
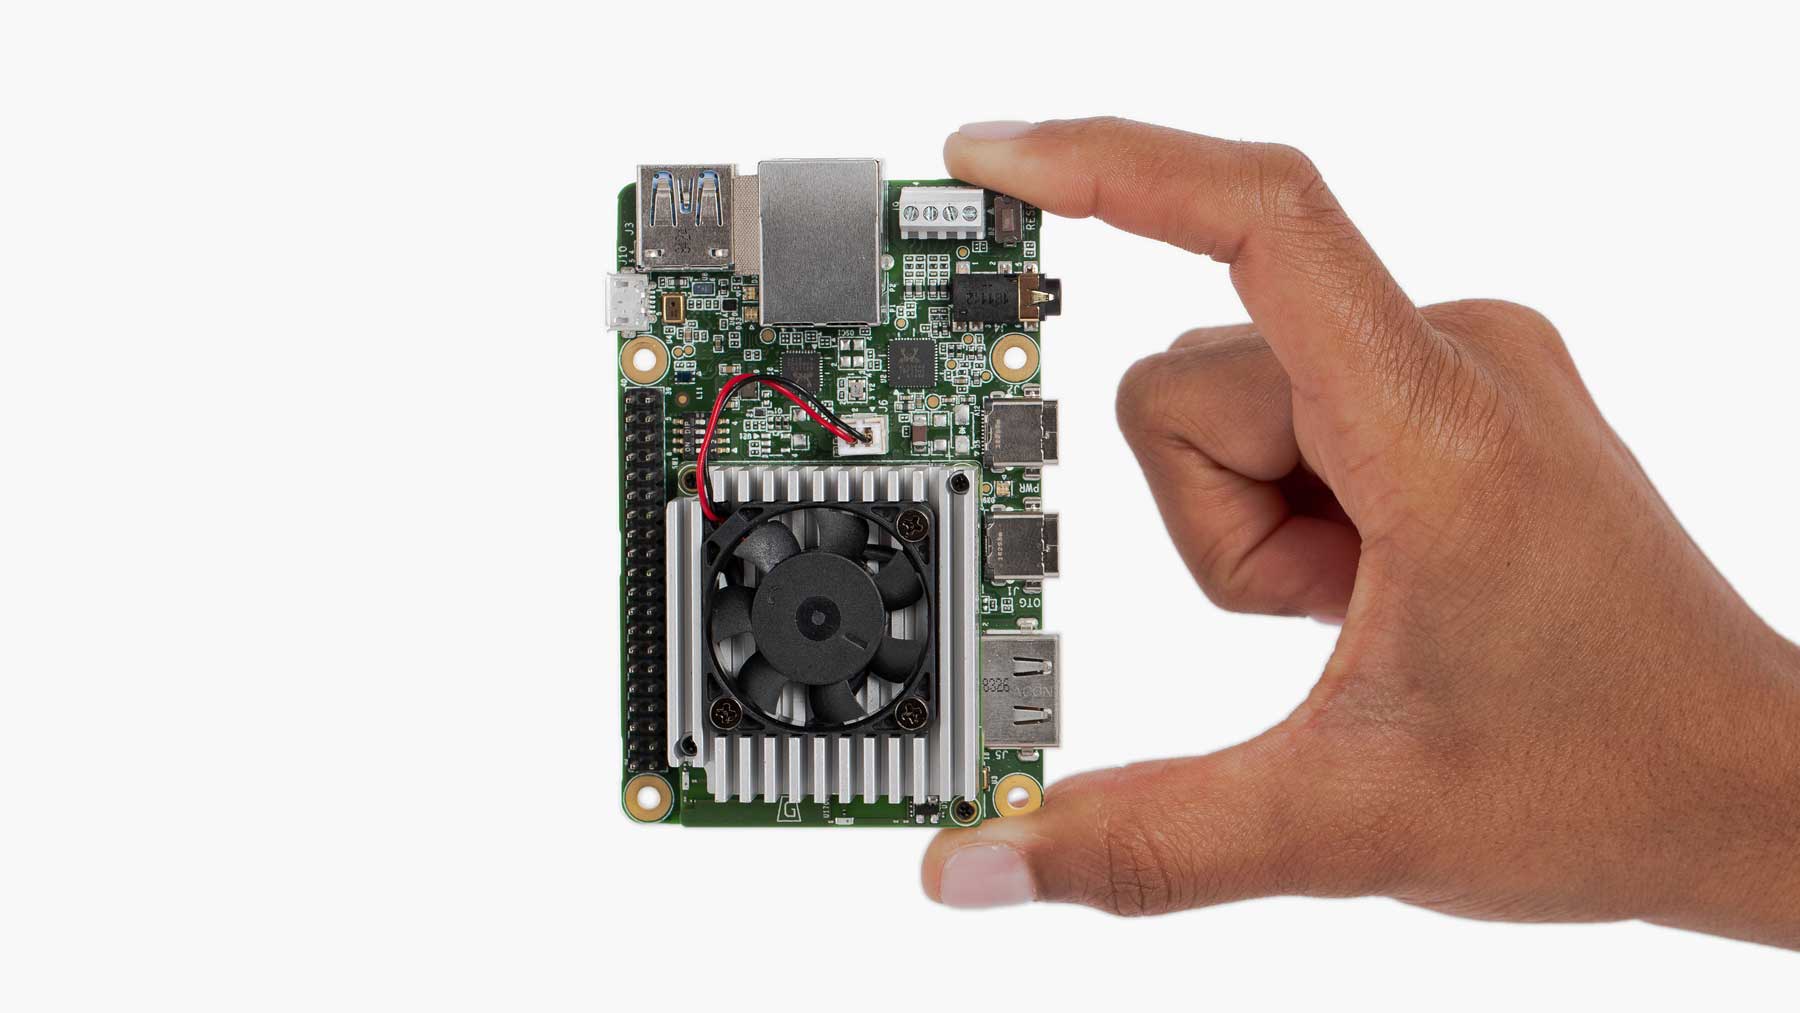
The Coral Dev Board is a single-board computer that contains an Edge TPU coprocessor. It's ideal for prototyping new projects that demand fast on-device inferencing for machine learning models. This page is your guide to get started.
The setup requires flashing Mendel Linux to the board, and then accessing the board's shell terminal. Once you have terminal access and update some of the software, we'll show you how to run an image classification model on the board.
If you want to learn more about the hardware, see the Dev Board datasheet.
1: Gather requirements
Before you begin, collect the following hardware:
- A host computer running Linux (recommended), Mac, or Windows 10
- Python 3 installed
- One microSD card with at least 8 GB capacity, and an adapter to connect it to your host computer
- One USB-C power supply (2-3 A / 5 V), such as a phone charger
- One USB-C to USB-A cable (to connect to your computer)
- An available Wi-Fi connection (or Ethernet cable)
Other Windows requirements
For compatibility with our command-line instructions and the shell scripts in our example code, we recommend you use the Git Bash terminal on Windows, which is included with Git for Windows. You should install it now and open the Git Bash terminal for all the command-line instructions below.
However, as of Git for Windows v2.28, the Git Bash terminal cannot directly access Python. So after you install Git Bash, open it and run the following commands to make Python accessible:
echo "alias python3='winpty python3.exe'" >> ~/.bash_profile

source ~/.bash_profile
2: Flash the board
The Dev Board's factory settings do not include a system image (it includes only the U-Boot bootloader), so you need to flash the board with Mendel Linux.
To simplify the flashing process, we created a runtime system that runs on a microSD card and flashes the board with the Mendel system image. Unlike other boards like Raspberry Pi, Mendel Linux does not run on the microSD card—we only use the microSD card to install the operating system on the built-in flash memory—you'll remove the microSD card at the end of this process. (If you don't have a microSD card, you can instead manually flash the board over USB.)
To flash your board using the microSD card, follow these steps:
-
Download and unzip the SD card image: enterprise-eagle-flashcard-20211117215217.zip
The ZIP contains one file named
flashcard_arm64.img. -
Use a program such as balenaEtcher to flash the
flashcard_arm64.imgfile to your microSD card.This takes 5-10 minutes, depending on the speed of your microSD card and adapter.
-
While the card is being flashed, make sure your Dev Board is completely unplugged, and change the boot mode switches to boot from SD card, as shown in figure 1.
Boot mode Switch 1 Switch 2 Switch 3 Switch 4 SD card ON OFF ON ON 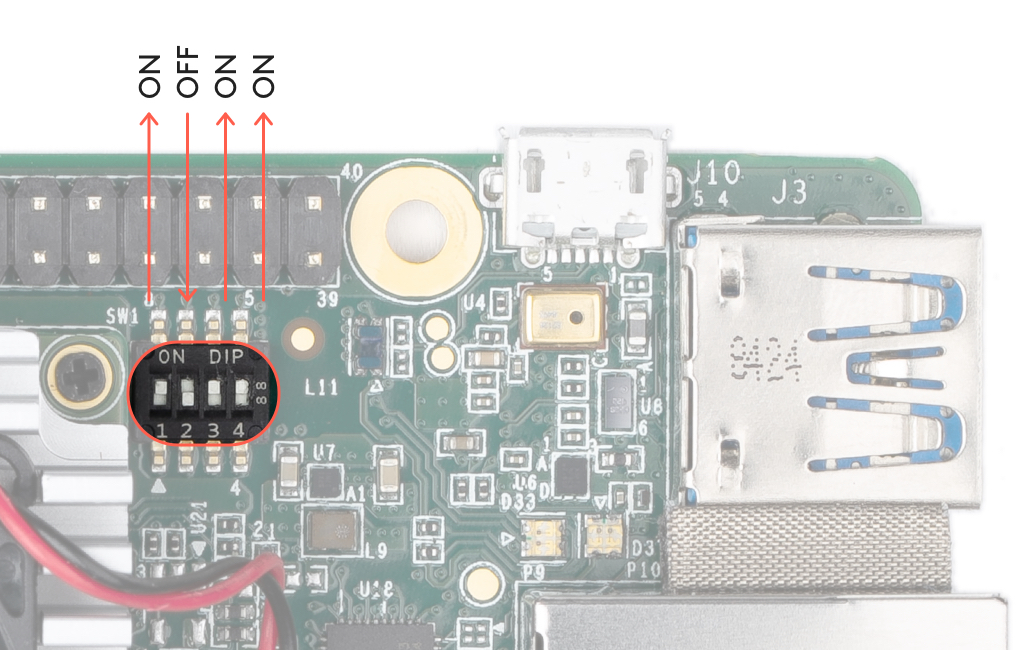
Figure 1. Boot switches set to SD card mode -
Once the card is flashed, safely remove it from your computer and insert it into the Dev Board (the card's pins face toward the board). The board should not be powered on yet.
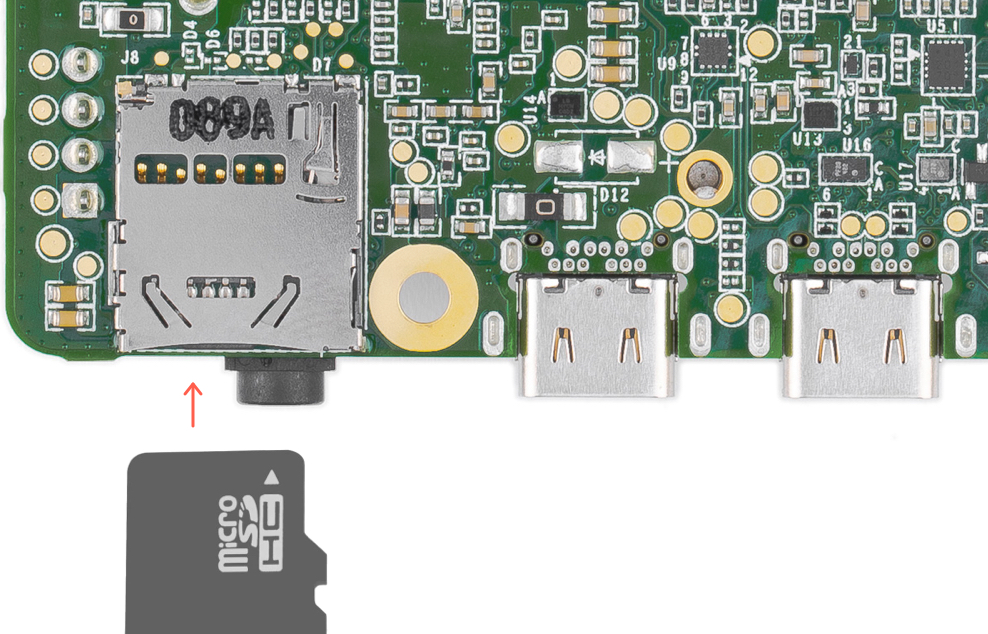
Figure 2. The microSD card slot is on the bottom -
Optional: If you'd like to see the bootloader logs while the board is being flashed, either connect a monitor to the board's HDMI port or connect to the board's serial console. Nothing will appear until you power the board in the next step.
-
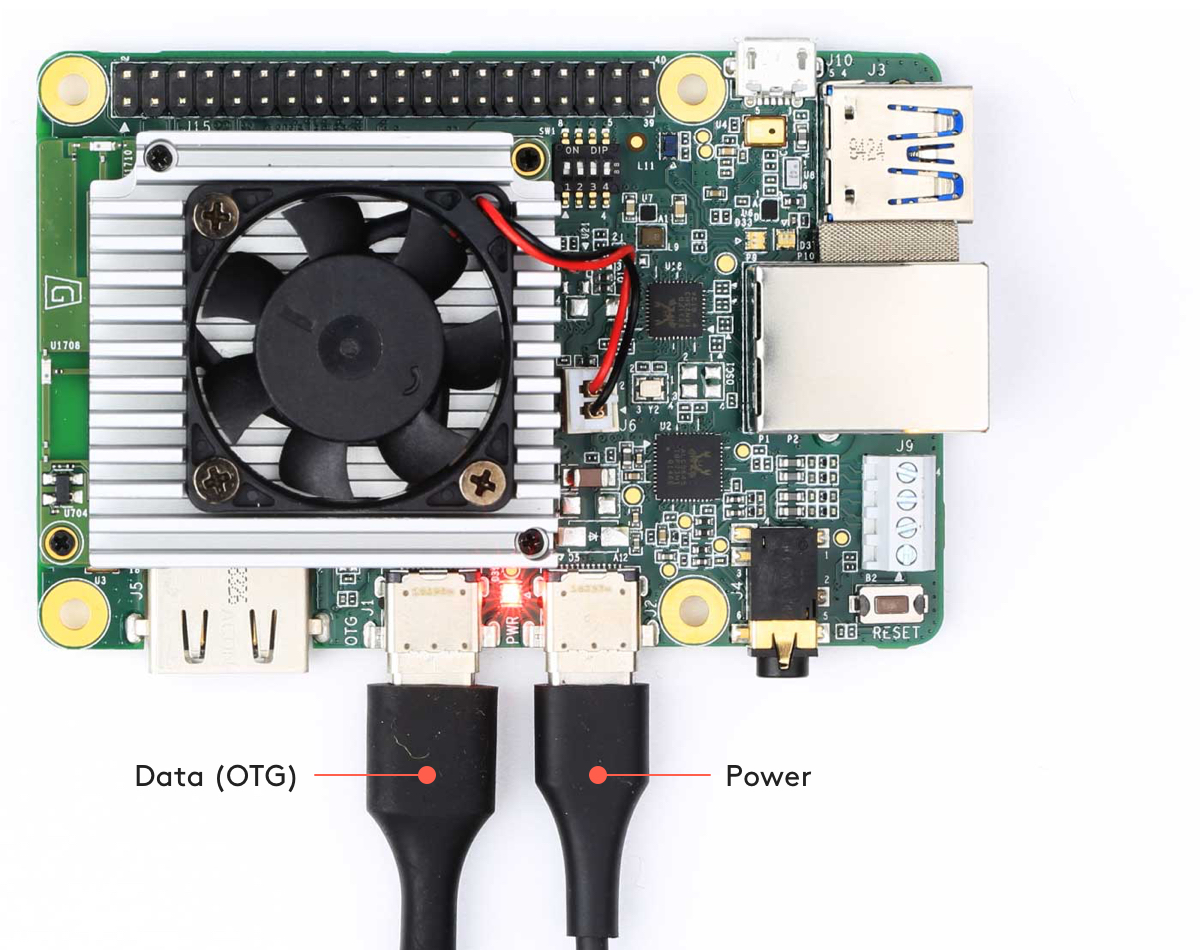
Power up the board by connecting your 2-3 A power cable to the USB-C port labeled "PWR" (see figure 3). The board's red LED should turn on.
Caution: Do not attempt to power the board by connecting it to your computer.When the board boots up, it loads the SD card image and begins flashing the board's eMMC memory.
It should finish in 5-10 minutes, depending on the speed of your microSD card.
You'll know it's done when the board shuts down and the red LED turns off.
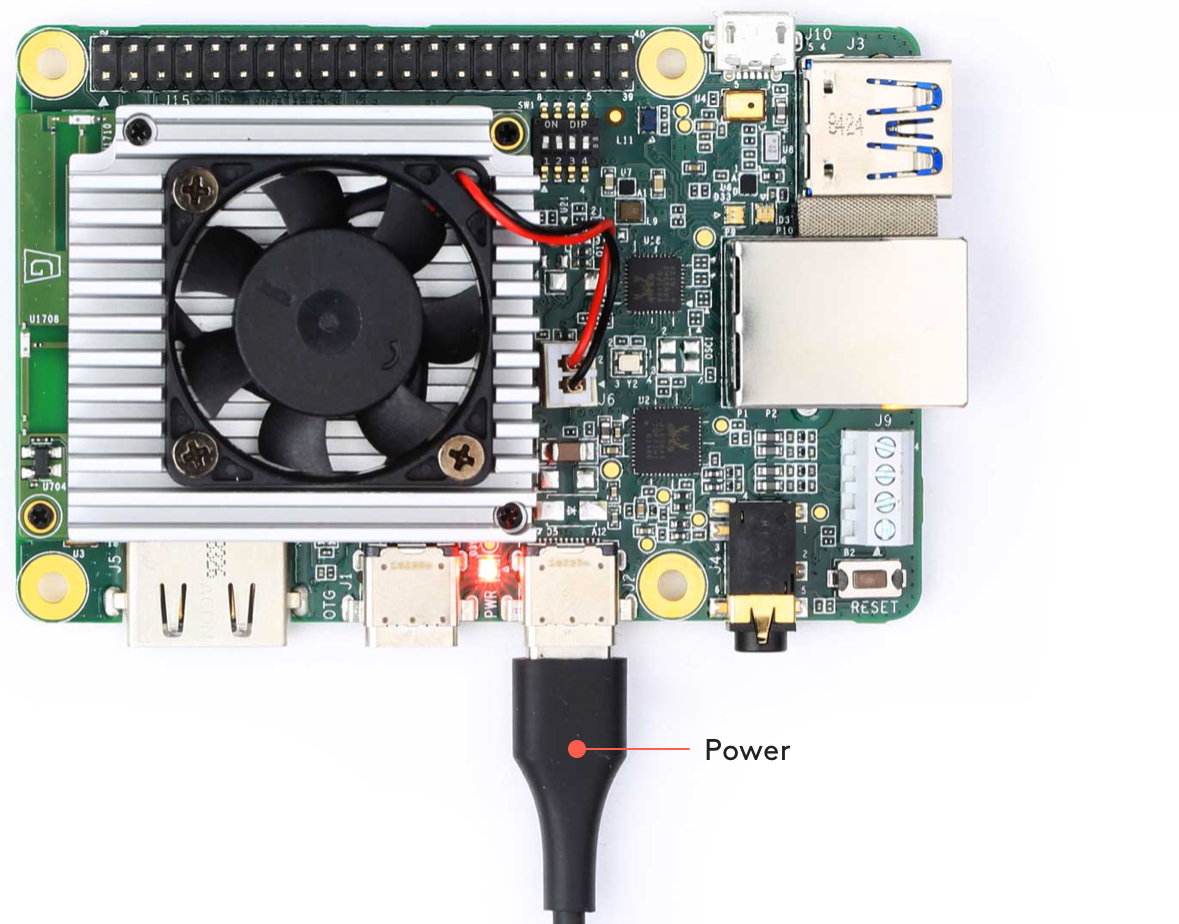
Figure 3. A USB-C power cable connected to the board -
When the red LED turns off, unplug the power and remove the microSD card.
-
Change the boot mode switches to eMMC mode, as shown in figure 4:
Boot mode Switch 1 Switch 2 Switch 3 Switch 4 eMMC ON OFF OFF OFF 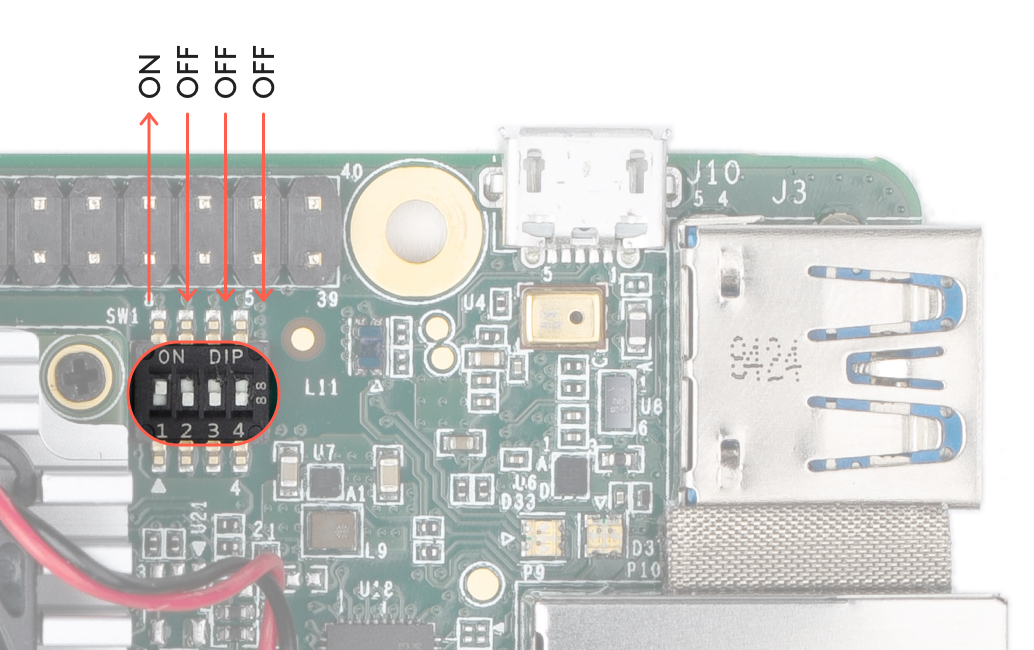
Figure 4. Boot switches set to eMMC mode -
Connect the board to power and it should now boot up Mendel Linux.
Booting up for the first time after flashing takes about 3 minutes (subsequent boot times are much faster).
3: Install MDT
While the board boots up, you can install MDT on your host computer.
MDT is a command line tool that helps you interact with the Dev Board. For example, MDT can list connected devices, install Debian packages on the board, and open a shell terminal on the board.
You can install MDT on your host computer follows:
python3 -m pip install --user mendel-development-toolYou might see a warning that mdt was installed somewhere that's not in your PATH
environment variable. If so, be sure you add the given location to your PATH, as appropriate for
your operating system. If you're on Linux, you can add it like this:
echo 'export PATH="$PATH:$HOME/.local/bin"' >> ~/.bash_profile

source ~/.bash_profileecho "alias mdt='winpty mdt'" >> ~/.bash_profile source ~/.bash_profile
4: Connect to the board's shell via MDT
Now that you have the Mendel system on the board, you can initiate a secure shell session using the MDT tool. Using MDT is just an easy way to generate an OpenSSH public/private key pair, push the public key onto the board, and then establish an SSH connection. (You should have already installed MDT on your host computer, as per the above requirements.)
First, connect a USB-C cable from your computer to the board's other USB port (labeled "OTG").
Now make sure MDT can see your device by running this command from your host computer:
mdt devicesYou should see output showing your board hostname and IP address:
orange-horse (192.168.100.2)If you don't see your device printed, it's probably because the system is still setting up Mendel.
So instead run mdt wait-for-device. When your board is ready, it will print "Found 1 devices."
hostname).
Now to open the device shell, run this command:
mdt shell
After a moment, you should see the board's shell prompt.
authorized_keys file, which then allows you to authenticate with SSH. (Using MDT is
just easier than manually copying the key over the serial console.)
For more information about what you can do with MDT, read about the Mendel Development Tool.
5: Connect to the internet
You'll need the board online to download system updates, models, and samples.
Either connect an Ethernet cable to the board or select a Wi-Fi network by running the following command in the device shell:
nmtui
Then select Activate a connection and select a network from the list under Wi-Fi (wlan0).
Alternatively, use the following command to connect to a known network name:
nmcli dev wifi connect <NETWORK_NAME> password <PASSWORD> ifname wlan0Verify your connection with this command:
nmcli connection show
You should see your selected network listed in the output. For example:
NAME                UUID                                  TYPE             DEVICE
MyNetworkName       61f5d6b2-5f52-4256-83ae-7f148546575a  802-11-wireless  wlan0
The DEVICE name is wlan0 for a Wi-Fi connection or eth0 for an Ethernet connection.
6: Update the Mendel software
Some of our software updates are delivered with Debian packages separate from the system image, so make sure you have the latest software by running the following commands.
sudo apt-get update

sudo apt-get dist-upgrade
Now you're ready to run a TensorFlow Lite model on the Edge TPU!
dist-upgrade command updates all system packages for your current Mendel
version. If you want to upgrade to a newer version of Mendel, you need to flash a new system image.
7: Run our demo app
For a video demo of the Edge TPU performance, run the following command from the Dev Board terminal:
edgetpu_demo --streamThen on your desktop (that's connected to the Dev Board)—if you're connected to the board using MDT over USB—open 192.168.100.2:4664 in a browser. If you're instead connected to the board by other means (such as SSH over LAN or with an Ethernet cable), type the appropriate IP address into your browser with port 4664.
You should then see a video playing in your browser. The footage of the cars is a recording, but the MobileNet model is executing in real time on your Dev Board to detect each car.
Or if you have a monitor attached to the Dev Board, you can instead see the demo on that screen:
edgetpu_demo --device8: Run a model using the PyCoral API
The demo above is rather complicated, so we've created some simple examples that demonstrate how to perform an inference on the Edge TPU using the TensorFlow Lite API (assisted by the PyCoral API).
Execute the following commands from the Dev Board shell to run our image classification example:
-
Download the example code from GitHub:
mkdir coral && cd coral git clone https://github.com/google-coral/pycoral.git cd pycoral -
Download the model, labels, and bird photo:
bash examples/install_requirements.sh classify_image.py -
Run the image classifier with the bird photo (shown in figure 6):
python3 examples/classify_image.py \
--model test_data/mobilenet_v2_1.0_224_inat_bird_quant_edgetpu.tflite \
--labels test_data/inat_bird_labels.txt \
--input test_data/parrot.jpg

You should see results like this:
----INFERENCE TIME----
Note: The first inference on Edge TPU is slow because it includes loading the model into Edge TPU memory.
13.1ms
2.7ms
3.1ms
3.2ms
3.1ms
-------RESULTS--------
Ara macao (Scarlet Macaw): 0.75781
Congrats! You just performed an inference on the Edge TPU using TensorFlow Lite.
To demonstrate varying inference speeds, the example repeats the same inference five times. It prints the time to perform each inference and then the top classification result (the label ID/name and the confidence score, from 0 to 1.0).
To learn more about how the code works, take a look at the classify_image.py source code
and read about how to run inference on the Edge TPU with Python.
Next steps
If you got the Coral Camera, see the guide to connect a camera to the Dev Board.
To run some other types of neural networks, check out our example projects, including examples that perform real-time object detection, pose estimation, keyphrase detection, on-device transfer learning, and more.
If you want to train your own TensorFlow model for the Edge TPU, try these tutorials:
- Retrain an image classification model (MobileNet) (runs in Google Colab)
- Retrain an object detection model (EfficientDet) (runs in Google Colab)
- More model retraining tutorials are available on GitHub.
- Or to build your own model that's compatible with the Edge TPU, read TensorFlow Models on the Edge TPU
If you'd like to browse the Mendel source code and build it yourself for the Dev Board, take a look at the Mendel Getting Started guide.
sudo shutdown now
When the red LED on the Dev Board turns off, you can unplug the power.
Is this content helpful?