Update or flash the Dev Board Mini
Now and then, we'll release updates for our Coral software or a new version of Mendel Linux for the Dev Board Mini. This page describes how to install these updates on your board.
Update your board with apt-get
To update the software packages in your current Mendel version—such as when we release a new Edge TPU Runtime and other API libraries—connect to the board (with MDT or the serial console) and run the following commands (first, make sure your board is online).
sudo apt-get update

sudo apt-get dist-upgrade

sudo reboot now
Rebooting isn't always required, but recommended in case there are any kernel updates.
Flash a new system image
Flashing your board is necessary if you want to upgrade to the latest Mendel version (you can retain all user data in the Home directory) or if your board is in a failed state and you want to start clean. If you just want to update your existing system with new packages, instead update with apt-get.
You can see your Mendel version if you connect to the board and run cat /etc/mendel_version. Then
see what Mendel versions are available on the Software page.
First-time setup
If it's your first time flashing a Dev Board Mini, start with the following one-time setup:
-
Install the fastboot tool.
On Linux, you can install as follows:
sudo apt-get install fastbootFor Mac, it's available from the Android SDK platform tools. This package has many tools, but you only need fastboot. So move that to a location in your
PATHenvironment variable, such as/Users/yourname/bin. -
If you're on Linux, reload the udev rules installed by fastboot above (actually from the (
android-sdk-platform-tools-common(package dependency):sudo udevadm control --reload-rules && sudo udevadm triggerAlso make sure your Linux user account is in the
plugdevanddialoutsystem groups by running this command:sudo usermod -aG plugdev,dialout <username>Then reboot your computer for the new groups to take effect.
Flash the board
Now you can flash the Dev Board Mini as follows:
-
Download the latest system image on your host computer:
cd $HOME/Downloads

curl -O https://dl.google.com/coral/mendel/excelsior/excelsior-eagle-20201210233645.zip

unzip excelsior-eagle-20201210233645.zip
To get a different Mendel version, see the software downloads.
-
Connect the board to power and to your computer via USB.
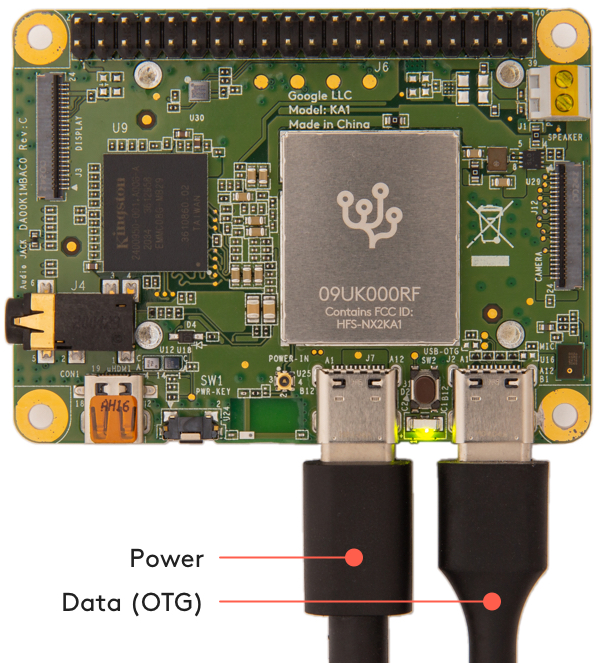
Figure 1. The USB power and data cables connected -
Enable fastboot mode on the board:
-
If you're already in the board's shell, run this command:
sudo reboot-bootloader -
Otherwise, run this from your host computer:
mdt reboot-bootloader
If you can't access the board with MDT, then connect to the serial console and run
sudo reboot-bootloader.If your board will not boot at all, then you can force-boot into fastboot mode.
-
-
Wait a moment for the board to reboot and enter fastboot mode.
You'll know it's in fastboot mode when the board's LED turns red.
-
Run the flash script:
cd excelsior-eagle-20201210233645

bash flash.sh
If you want to also wipe the Home directory, add the
-Hflag.
Flashing should finish within 5 minutes, and then the system reboots. It takes another few minutes for the the board to boot up for the first time (later boots are much faster).
When the board is finished rebooting, you can connect with MDT. To avoid guessing when it's done, run the following command and MDT will automatically connect when the board is ready:
mdt wait-for-device && mdt shell/home directory), because flashing the
board resets the known networks. So if you preserved the Home directory, you just need to get the
board back your Wi-Fi using the serial console.
If you wiped the Home directory, then see how to connect
MDT on macOS.
hostname).
If you connect with the serial console,
the login and password are reset to the defaults: both are mendel.
Force-boot into fastboot mode
If you can't even boot your board to execute fastboot-reboot, then you can force the
system into fastboot mode by grounding a test-point pin on the top of the Dev Board Mini
and then run a special boot script, as follows.
-
Complete the first-time setup above, if necessary.
-
Do not power the board. If connected, unplug all cables from the board now.
However, connect your USB data cable to your computer, and have it ready to connect to the board later.
-
On your host computer, install these Python packages required by the boot script:
python3 -m pip install pyftdi pyserial -
Download the latest system image on your host computer:
cd $HOME/Downloads

curl -O https://dl.google.com/coral/mendel/excelsior/excelsior-eagle-20201210233645.zip

unzip excelsior-eagle-20201210233645.zip
To get a different Mendel version, see the software downloads.
-
Run
enable_lk_fastboot.shto enable fastboot via the LK bootloader:cd excelsior-eagle-20201210233645 bash enable_lk_fastboot.shBy design, this has no immediate effect; the script waits for the device to boot. So the console should print several lines, ending with this one:
INFO: Waiting to connect platform... -
Use a wire to connect the
KPCOL0test point to ground, as shown in figure 2. Ideally, use a female-to-male jumper wire, with the female end attached to pin 39 on the GPIO header (ground), and then hold the male end firmly on the test point.
Figure 2. The KPCOL0 test point and an available ground pin -
While maintaining a firm connection with the jumper wire, carefully connect the USB data cable to the board's USB OTG port.
As the board boots, the
enable_lk_fastboot.shscript you ran above identifies the board, enables the LK bootloader, and initiates fastboot mode. That prompt will return to you after it prints this:INFO: Loading file: lk.bin INFO: Send lk.bin INFO: Jump daIf you don't see this, then your wire connection failed—power off the board and try again from step 5.
-
When the prompt returns to you, you can release the jumper wire.
-
Unlike the
reboot-bootloadercommand, the LED does not turn red to indicate it's in fastboot mode. So you can verify the board is fastboot mode with this command:fastboot devicesYou should see your device listed, like this:
0123456789ABCDEF fastboot -
Now you can flash the board:
bash flash.shTo also wipe the Home directory, add the
-Hflag.
Is this content helpful?