Connect to the Dev Board Mini's serial console
Although we recommend that you access the shell terminal with MDT, some situations require direct connection with the serial console. So this page shows you how to do that with the Dev Board Mini.
You'll need the following items:
- Coral Dev Board Mini
- Linux, Windows 10, or macOS computer
- USB-to-TTL serial cable (it must support 3.3 V logic levels, such as this one by Adafruit)
- 2 A / 5 V USB-C power supply
Connect with Linux
You can connect to the Dev Board Mini's serial console from Linux as follows:
-
First make sure your Linux user account is in the
plugdevanddialoutsystem groups by running this command:sudo usermod -aG plugdev,dialout <username>Then reboot your computer for the new groups to take effect.
-
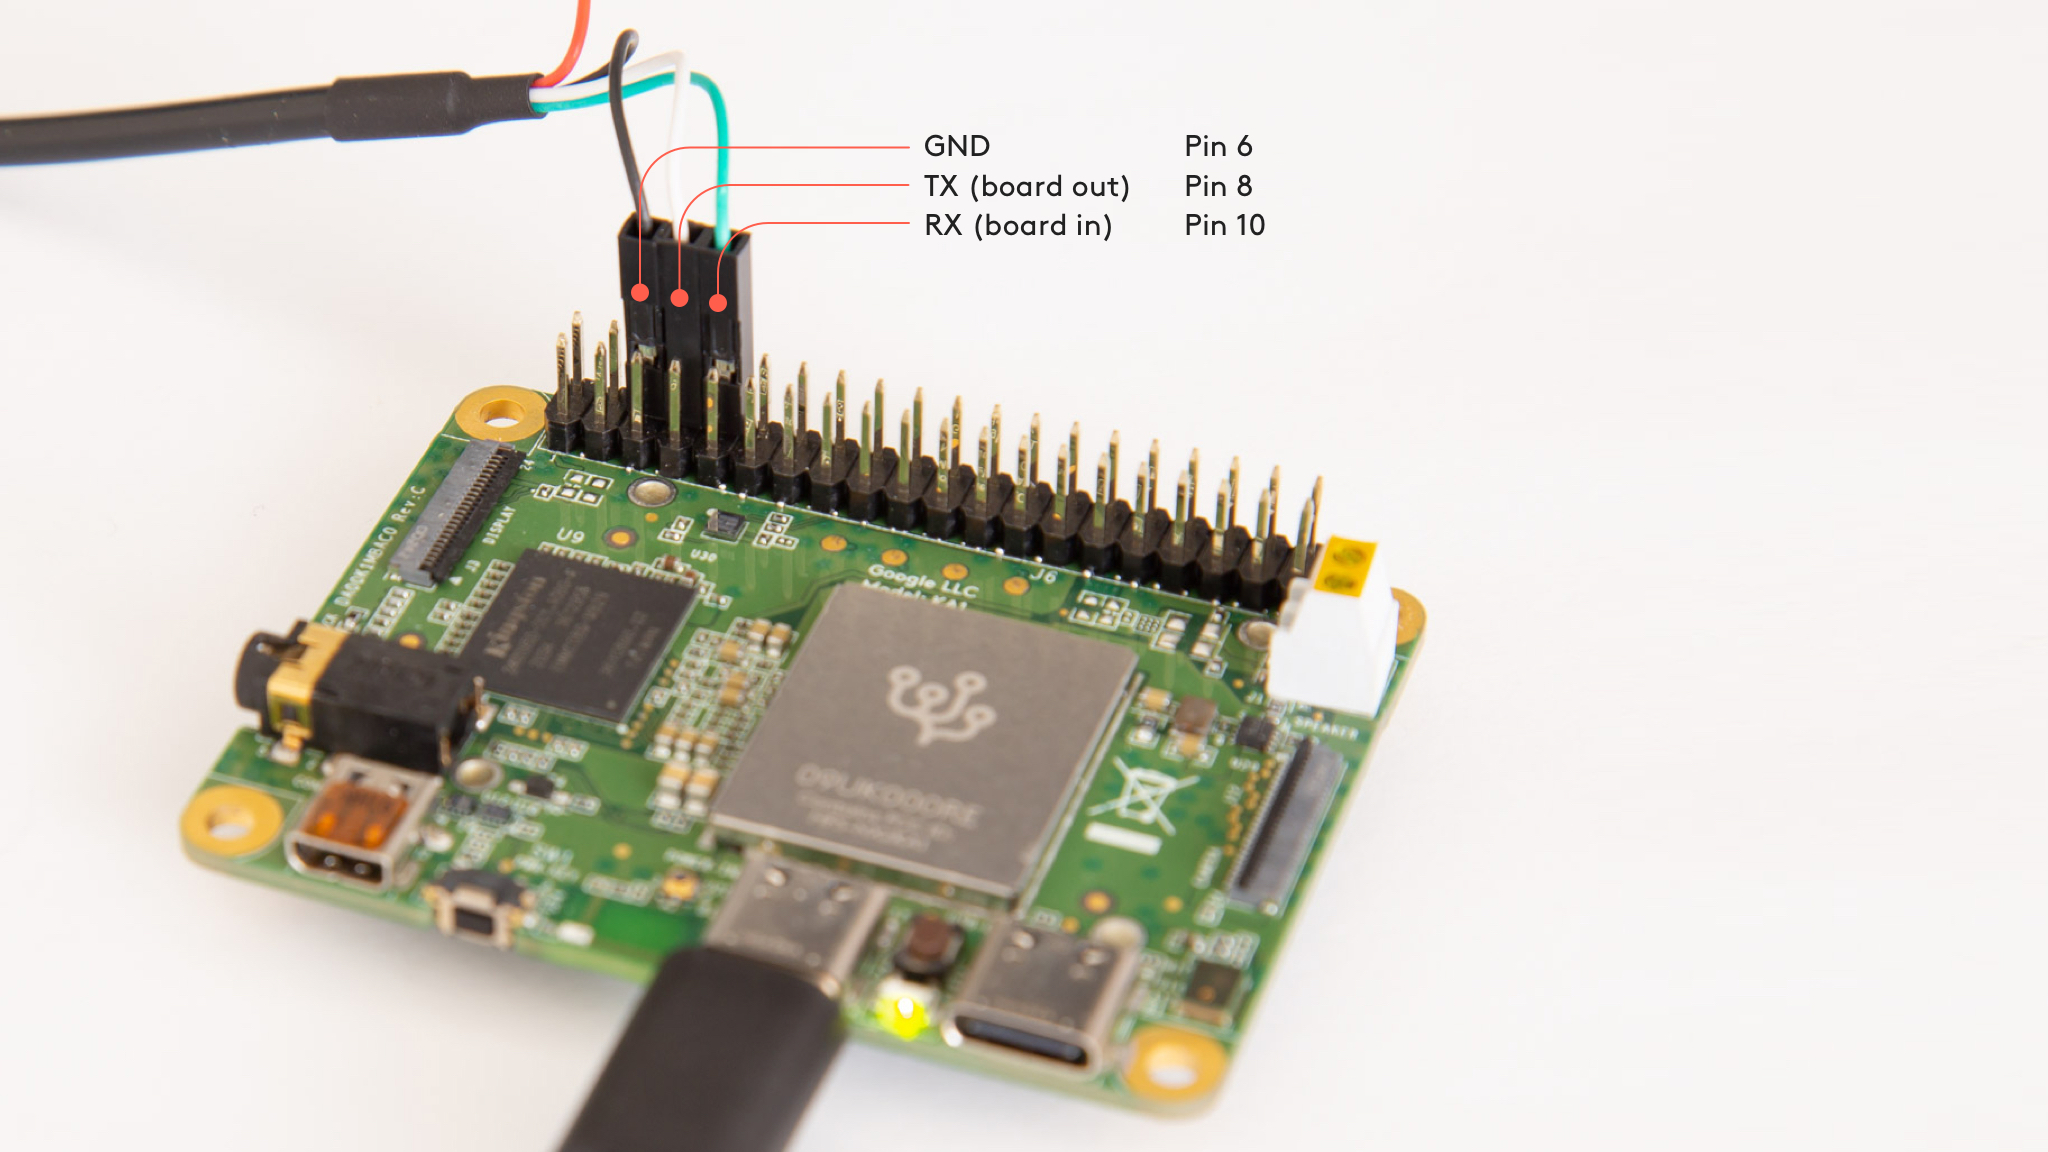
Connect the USB-to-TTL serial cable to your computer and the board, as shown in figure 1:
- Pin 6 is ground
- Pin 8 is UART TX
- Pin 10 is UART RX
Warning: Do not connect the power wire (if provided). Doing so allows power to flow between the USB power and your computer, which degrades the USB power supply's ability to power the board, and can potentially damage to your hardware. -
Connect the board to power using the USB power port, and firmly press the power button to boot the board.
-
Determine the USB-to-TTL cable's device name by running this command on your Linux computer:
dmesg | grep ttyUSBYou should see results such as this:
[ 6437.706335] usb 2-13.1: cp210x converter now attached to ttyUSB0If you don't see anything like this, double-check your USB cable is connected.
-
Then connect with this command (using the name of the device listed in the previous step):
screen /dev/ttyUSB0 115200Help! IfscreenprintsCannot access line '/dev/ttyUSB0', then your Linux user account is not in theplugdevand/ordialoutsystem group. Ask your system admin to add your account to both groups, and then restart your computer for it to take effect.If you see
[screen is terminating], it might also be due to the system groups, or there's something else wrong withscreen—ensure allscreensessions are closed (typescreen -lsto see open sessions), unplug the USB cable from the Dev Board, and then try again. -
If the screen terminal is blank, press Enter and then you should see the login prompt appear.
The default username and password are both "mendel".
When you're done, kill the screen session by pressing CTRL+A,
K, and then Y to confirm.
Connect with Windows
You can connect to the Dev Board Mini's serial console from a Windows 10 computer as follows:
-
Connect the USB-to-TTL serial cable to your computer and the board, as shown in figure 1:
- Pin 6 is ground
- Pin 8 is UART TX
- Pin 10 is UART RX
Warning: Do not connect the power wire (if provided). Doing so allows power to flow between the USB power and your computer, which degrades the USB power supply's ability to power the board, and can potentially damage to your hardware. -
Connect the board to power using the USB power port, and firmly press the power button to boot the board.
-
On your Windows computer, open Device Manager and find the cable's COM port.
Within a minute of connecting the USB cable, Windows should automatically install the necessary driver. So if you expand Ports (COM & LPT), you should see a device corresponding to your serial cable (for example, "Silicon Labs CP210x USB to UART Bridge" or "Prolific USB-to-Serial Comm Port").
Take note of the COM port for the serial cable (such as "COM3"). You'll use it in the next step.
If Windows cannot identify the USB cable, it should instead be listed under Other devices. Right-click on the device and select Update driver to find the appropriate device driver.
-
Open PuTTY or another serial console app and start a serial console connection with the above COM port, using a baud rate of
115200. For example, if using PuTTY:-
Select Session in the left pane.
-
For the Connection type, select Serial.
-
Enter the COM port ("COM3") for Serial line, and enter "115200" for Speed.
-
Then click Open.
-
-
If the screen terminal is blank, press Enter and then you should see the login prompt appear.
The default username and password are both "mendel".
Connect with macOS
You can connect to the Dev Board Mini's serial console from a macOS computer as follows:
-
Connect the USB-to-TTL serial cable to your computer and the board, as shown in figure 1:
- Pin 6 is ground
- Pin 8 is UART TX
- Pin 10 is UART RX
Warning: Do not connect the power wire (if provided). Doing so allows power to flow between the USB power and your computer, which degrades the USB power supply's ability to power the board, and can potentially damage to your hardware. -
Connect the board to power using the USB power port, and firmly press the power button to boot the board.
-
Determine the USB-to-TTL cable's device name by running this command from your Mac terminal:
ls /dev/cu*You should see a device with the name
usbserial(such as/dev/cu.usbserial-0001). If not, you might need to install a driver provided by the cable manufacturer.You'll use this
usbserialdevice name in the next step. However, if you've already installed a driver for the chipset in your serial cable (such as the CP210x VCP driver required for the Dev Board), then you should use a different device name that appears (such ascu.SLAB_USBtoUARTfor CP210x devices/cables). -
Connect to the serial console using
screenand a baud rate of 115200. For example:screen /dev/cu.usbserial-0001 115200Your device name might be different, but the baud rate is always 115200.
-
If the screen terminal is blank, press Enter and then you should see the login prompt appear.
The default username and password are both "mendel".
When you're done, kill the screen session by pressing CTRL+A,
K, and then Y to confirm.
Connect over USB OTG
You can also connect to the serial console without the USB-to-TTL cable, but only if your host computer is Linux or Mac, and your board is fully booted up.
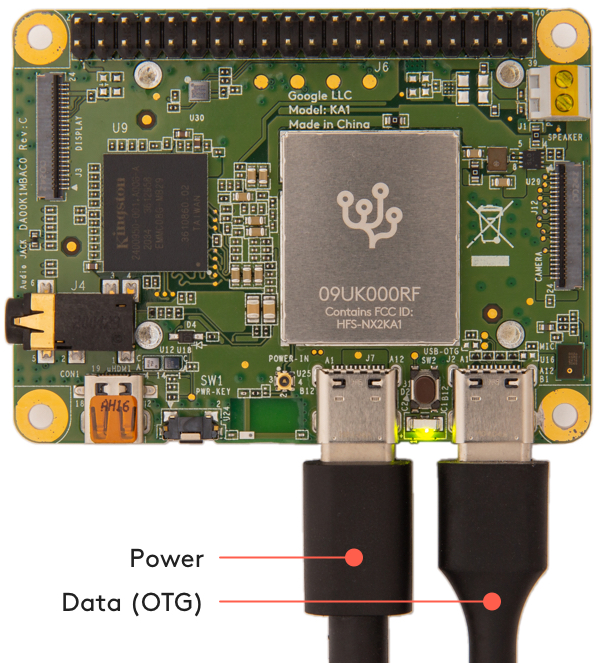
To connect to the serial console using the USB OTG port, follow these steps:
-
Make sure your board is fully booted up.
-
Connect a USB cable from your computer to the board's OTG port, and then run the following command in a terminal:
-
On Linux:
ls /dev/ttyACM* -
On Mac:
ls /dev/cu.usbmodem*
-
-
Connect to the device shown using a serial console program such as
screenas follows:screen /dev/ttyACM0 115200 -
If the screen terminal is blank, press Enter and then you should see the login prompt.
The default username and password are both "mendel".
When you're done, kill the screen session by pressing CTRL+A,
K, and then Y to confirm.
Is this content helpful?