Update or flash the Dev Board
Periodically, we'll release updates for our Coral software or a new version of Mendel Linux for the Dev Board. This page describes how to install these updates on your board.
Update your board with apt-get
To update the software packages in your current Mendel version—such as when we release a new Edge TPU Runtime and other API libraries—connect to the board (with MDT or the serial console) and run the following commands (first, make sure your board is online).
sudo apt-get update

sudo apt-get dist-upgrade

sudo reboot now
Rebooting isn't always required, but recommended in case there are any kernel updates.
apt-get. Check your version by running
cat /etc/mendel_version; if it's 2.0 or lower, we recommend that you
flash the system image.
Flash a new system image
Flashing your board is necessary if you want to upgrade to the latest Mendel version or if your board is in a failed state and you want to start clean. If you just want to update your existing system with new packages, instead update with apt-get.
You can see your Mendel version if you connect to the board and run cat /etc/mendel_version.
Then see what Mendel versions are available on the Software page.
If it's your first time flashing the board (or you're okay with deleting all user data), instead follow the guide to Get started with the Dev Board, which flashes the board using a microSD card.
First-time setup
If it's your first time flashing a Dev Board from the command line, start with the following one-time setup:
-
Install the fastboot tool.
On Linux, you can install as follows:
sudo apt-get install fastbootFor Mac, it's available from the Android SDK platform tools. This package has many tools, but you only need fastboot. So move that to a location in your
PATHenvironment variable, such as/Users/yourname/bin. -
If you're on Linux, add the udev rules required for fastboot:
sudo sh -c "echo 'SUBSYSTEM==\"usb\", ATTR{idVendor}==\"0525\", MODE=\"0664\", \
GROUP=\"plugdev\", TAG+=\"uaccess\"' >> /etc/udev/rules.d/65-edgetpu-board.rules"

sudo udevadm control --reload-rules && sudo udevadm trigger
Also make sure your Linux user account is in the
plugdevanddialoutsystem groups by running this command:sudo usermod -aG plugdev,dialout <username>Then reboot your computer for the new groups to take effect.
Flash the board
Now you can flash the Dev Board as follows.
/home
directory. So if your board is running Mendel 4.0 or lower, back up any personal data before you
proceed. For example, you can create a TAR of your /home directory and use mdt pull to copy the TAR from the
board. Then use mdt push to move it
back.
-
Verify the boot mode.
First, make sure the boot mode switches are set to eMMC mode as follows. If they're not set this way, power off the board before you change them.
Boot mode Switch 1 Switch 2 Switch 3 Switch 4 eMMC ON OFF OFF OFF 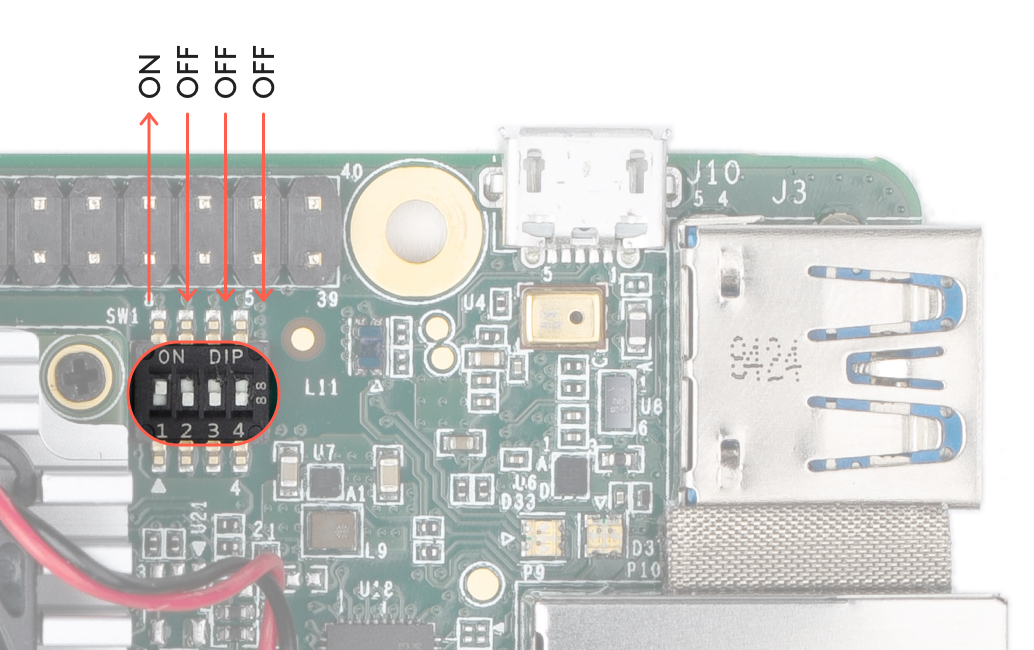
Figure 1. Boot switches set to eMMC mode -
Connect to the USB data port.
Attach a USB cable from your host computer to the USB port on the Dev Board labeled "OTG" (see figure 2).
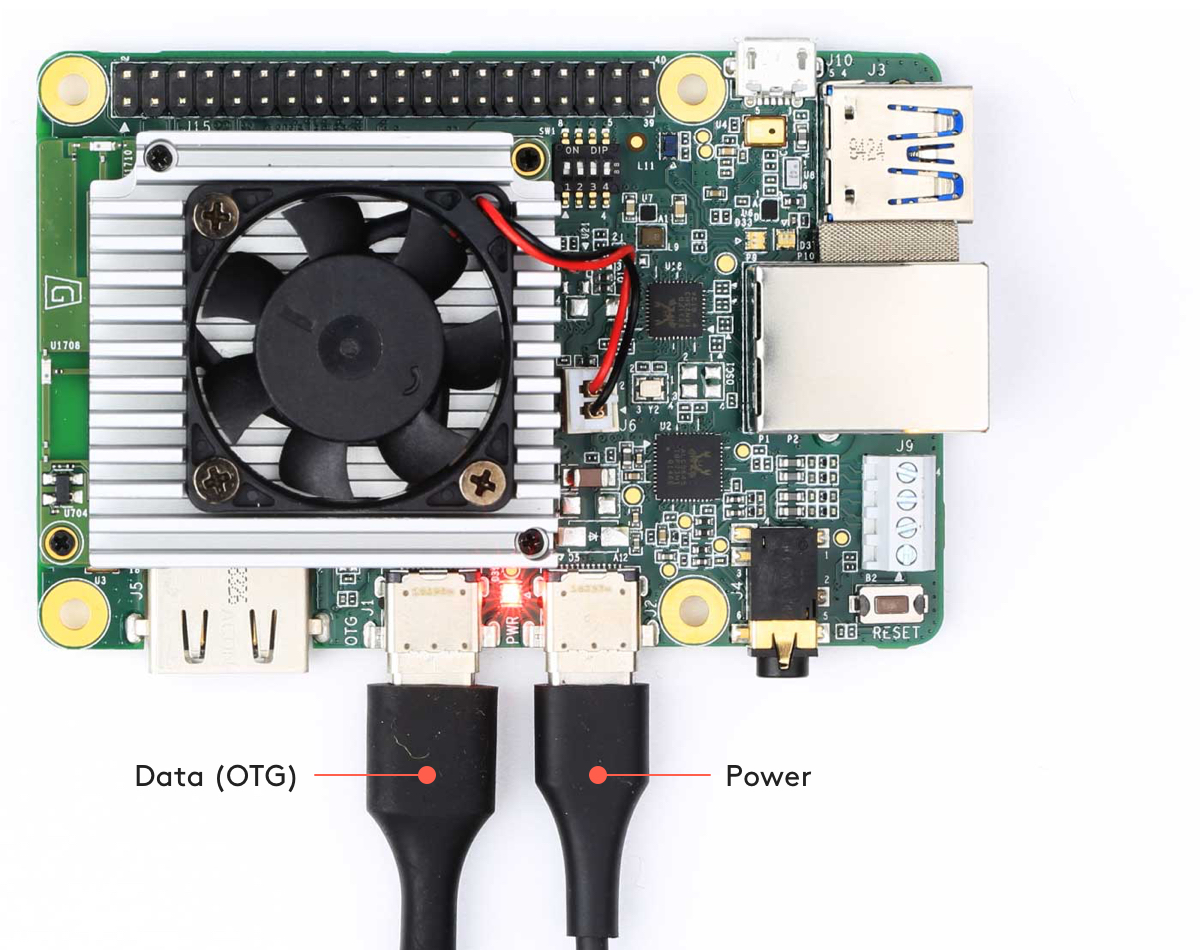
Figure 2. A USB-C data cable connected to the board (in addition to the power cable) -
Power on the board.
If it's not already booted, plug in the board and wait for it to power on.
Verify the board is connected to your computer by running this command from your computer (requires MDT):
mdt devices
You should see output such as this:
orange-horse (192.168.100.2)
-
Reboot the board into fastboot mode.
Caution: You might be about to delete personal data on the board. Now is the time to back it up.Run the following command from your computer:
mdt reboot-bootloader
After a moment, you can verify the board started in fastboot mode with this command (requires
fastboot):fastboot devices
You should see a line printed like this:
1b0741d6f0609912 fastboot
Help! Iffastboot devicesprints nothing, wait a few more seconds for the device to reboot into fastboot, then try again.If it still prints nothing, verify the Dev Board is connected to your computer via USB as shown in figure 2 and you rebooted the board with the command
sudo reboot-bootloader. If so, try installing a more recent version offastbootfrom Android SDK Platform-tools and try again. (Be sure to add the new fastboot to yourPATHenvironment variable.) -
Download the system image.
Run the following commands on your host computer:
cd $HOME/Downloads
curl -O https://dl.google.com/coral/mendel/enterprise/enterprise-eagle-20211117215217.zip
unzip enterprise-eagle-20211117215217.zip \ && cd enterprise-eagle-20211117215217 -
Flash the board.
If your board is currently running Mendel 4.0 or lower, this step wipes all the board data, including the
/homedirectory. If it's running Mendel 5.0 or higher, then the/homedirectory is preserved by default (you can intentionally wipe it by adding the-Hflag to the following command).bash flash.sh
This starts the flashing process and you'll see various output.
It takes about 5 minutes to complete. When flashing is complete, your board reboots.
-
Log in.
You can log in to the board's shell using MDT:
mdt shell
Mac users: If you're on macOS 10.15 (Catalina) or higher, this won't work (even if you preserved the board's/homedirectory and previously installed an SSH key, because flashing the board reset its known networks—you might simply need to get the board back your Wi-Fi using the serial console). See the steps to connect MDT on macOS.If MDT is unable to find your device, it's probably because the system is still setting up Mendel. This initial setup takes 2-3 minutes after you flash it (subsequent boot times are much faster). Instead of manually retrying, you can run
mdt wait-for-device && mdt shelland it will connect when the device is ready.Then restore any data you backed up and reconnect to the internet, if necessary.
hostname).
If you attempt to connect with the serial console,
the login and password are reset to the defaults:
login is mendel; password is mendel.
Flash from U-Boot on an SD card
If you can't even boot your board into U-Boot, then you can recover the system by accessing the U-Boot prompt from an image on the SD card, and then enable fastboot mode to flash the board. This also gives you general access to U-Boot for other troubleshooting.
-
Enable boot from SD card.
Unplug the Dev Board and change the boot mode switches to boot from SD card:
Boot mode Switch 1 Switch 2 Switch 3 Switch 4 SD Card ON OFF ON ON 
Figure 3. Boot switches set to SD card mode -
Flash an SD card with the recovery image.
On your host computer, download and unpack the latest system image:
curl -O https://dl.google.com/coral/mendel/enterprise/enterprise-eagle-20211117215217.zip


unzip enterprise-eagle-20211117215217.zip
Inside the package, find the
recovery.imgfile.Then use a program such as balenaEtcher to flash the
recovery.imgfile to your microSD card.Help! If the flash program displays a warning such as, "The image does not appear to contain a partition table," that's okay—it's true that there is no partition table in this image, but this is working as intended so you can continue. -
Connect to the serial console.
Note: The board should not be powered on yet.Use a USB-micro-B cable to connect your host computer to the serial console port on the board (see figure 4). The orange and green LEDs on the board will illuminate.
Follow these instructions to open the serial console (complete all steps, but do not plug the board into power). When you complete those steps, the prompt should disappear and your terminal should become completely blank (because the board is not powered on yet).
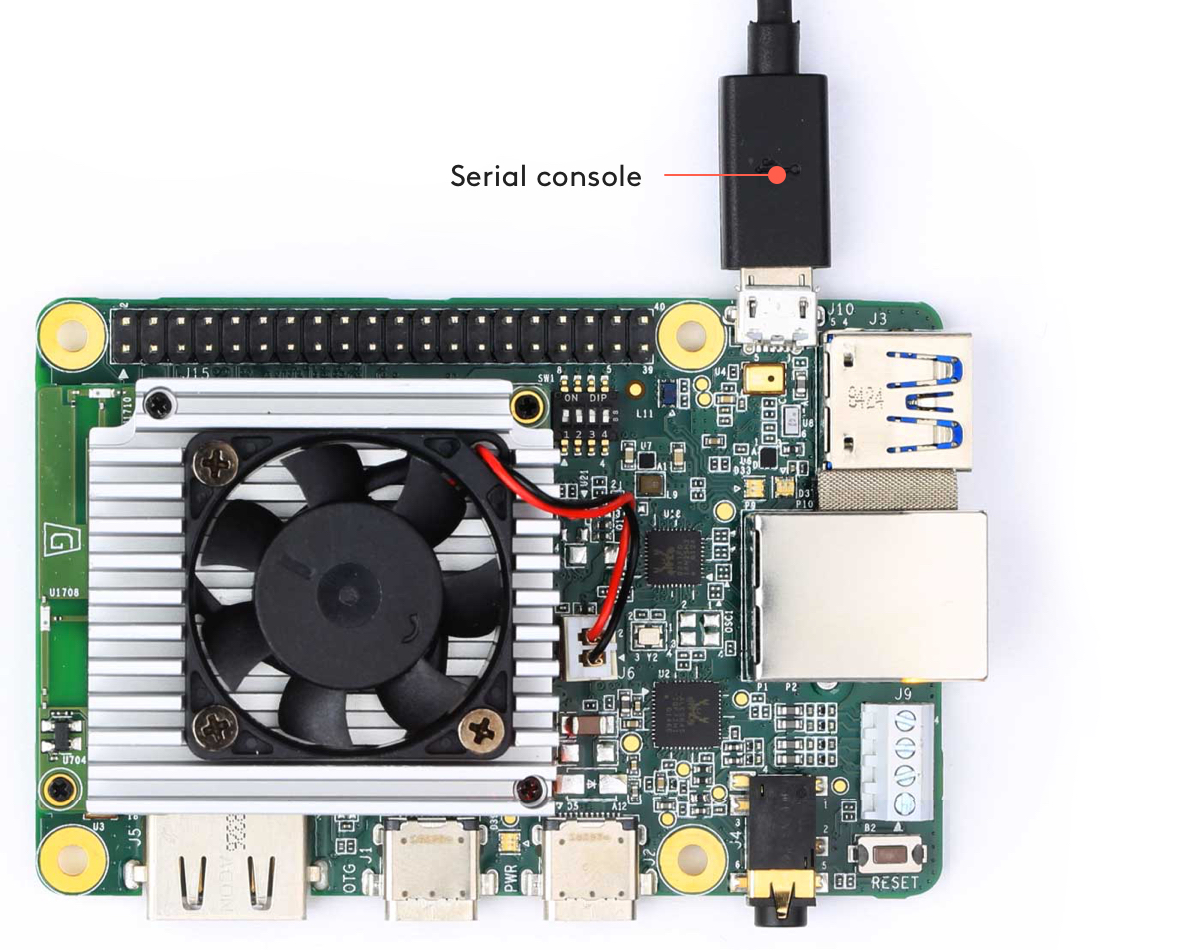
Figure 4. A USB-micro-B cable connected to the serial console port -
Insert the SD card and then power on the board.
The SD card slot is on the bottom of the Dev Board.
Plug in your 2 - 3A power cable to the USB-C port labeled "PWR" (see figure 5).
Caution: Do not attempt to power the board by connecting it to your computer.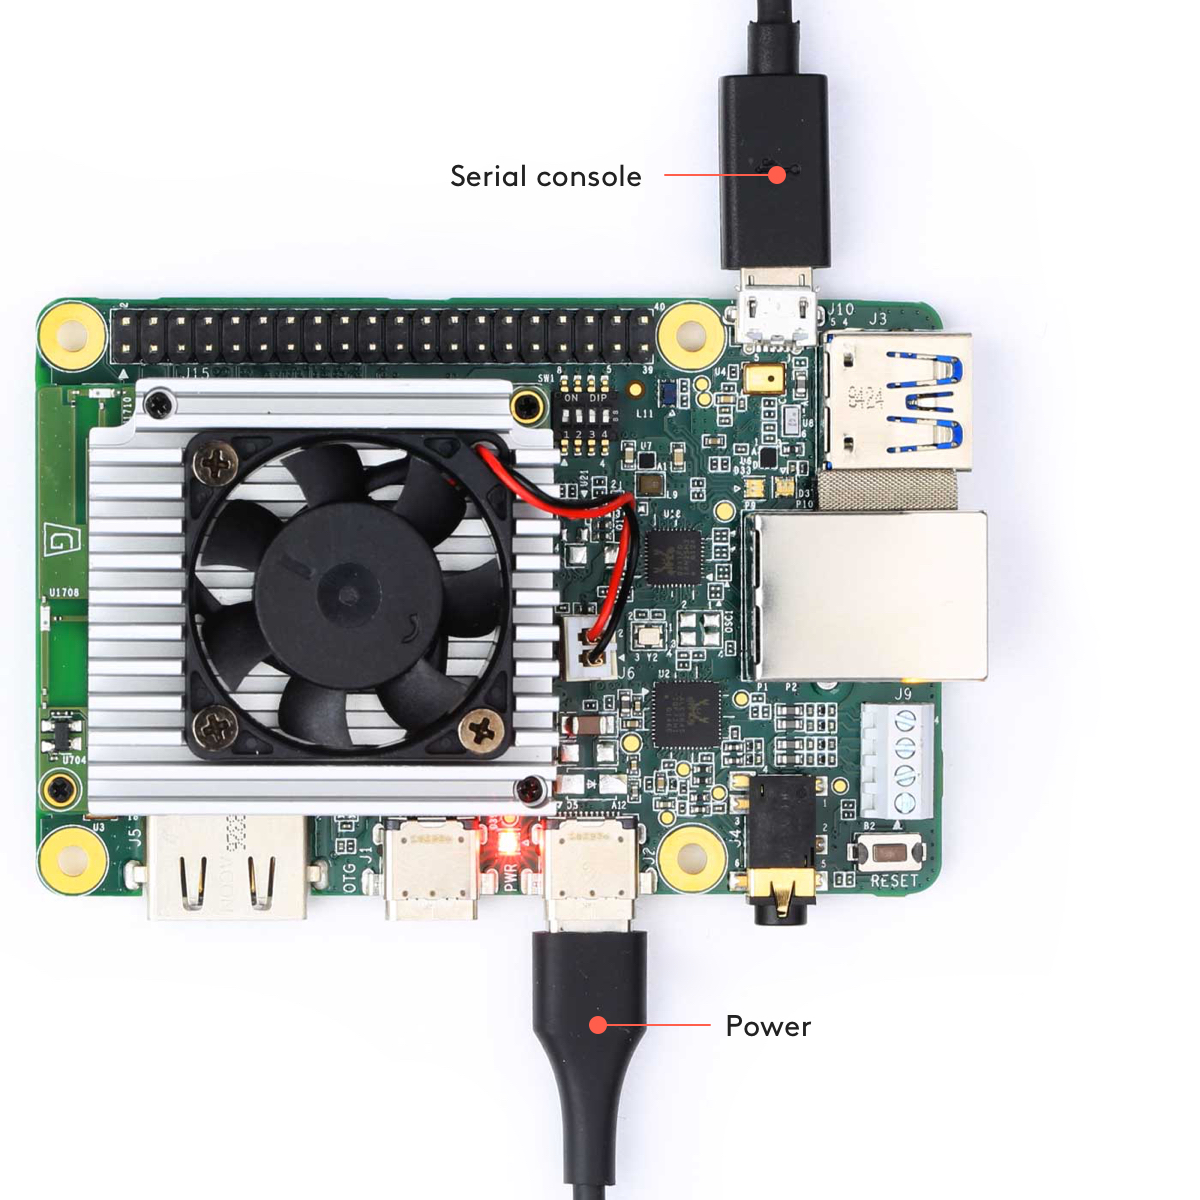
Figure 5. A USB-C power cable connected to the board (in addition to the serial cable) -
Start fastboot.
At the
u-bootprompt that appears in yourscreensession (from step 3), start fastboot mode:fastboot 0
The cursor moves to the next line but there is no output. That's as expected.
-
Connect to the USB data port.
Use a USB-C cable to connect your host computer (Linux or Mac) to the USB-C data port on the Dev Board labeled "OTG" (see figure 6). (This is the connection used by fastboot.)
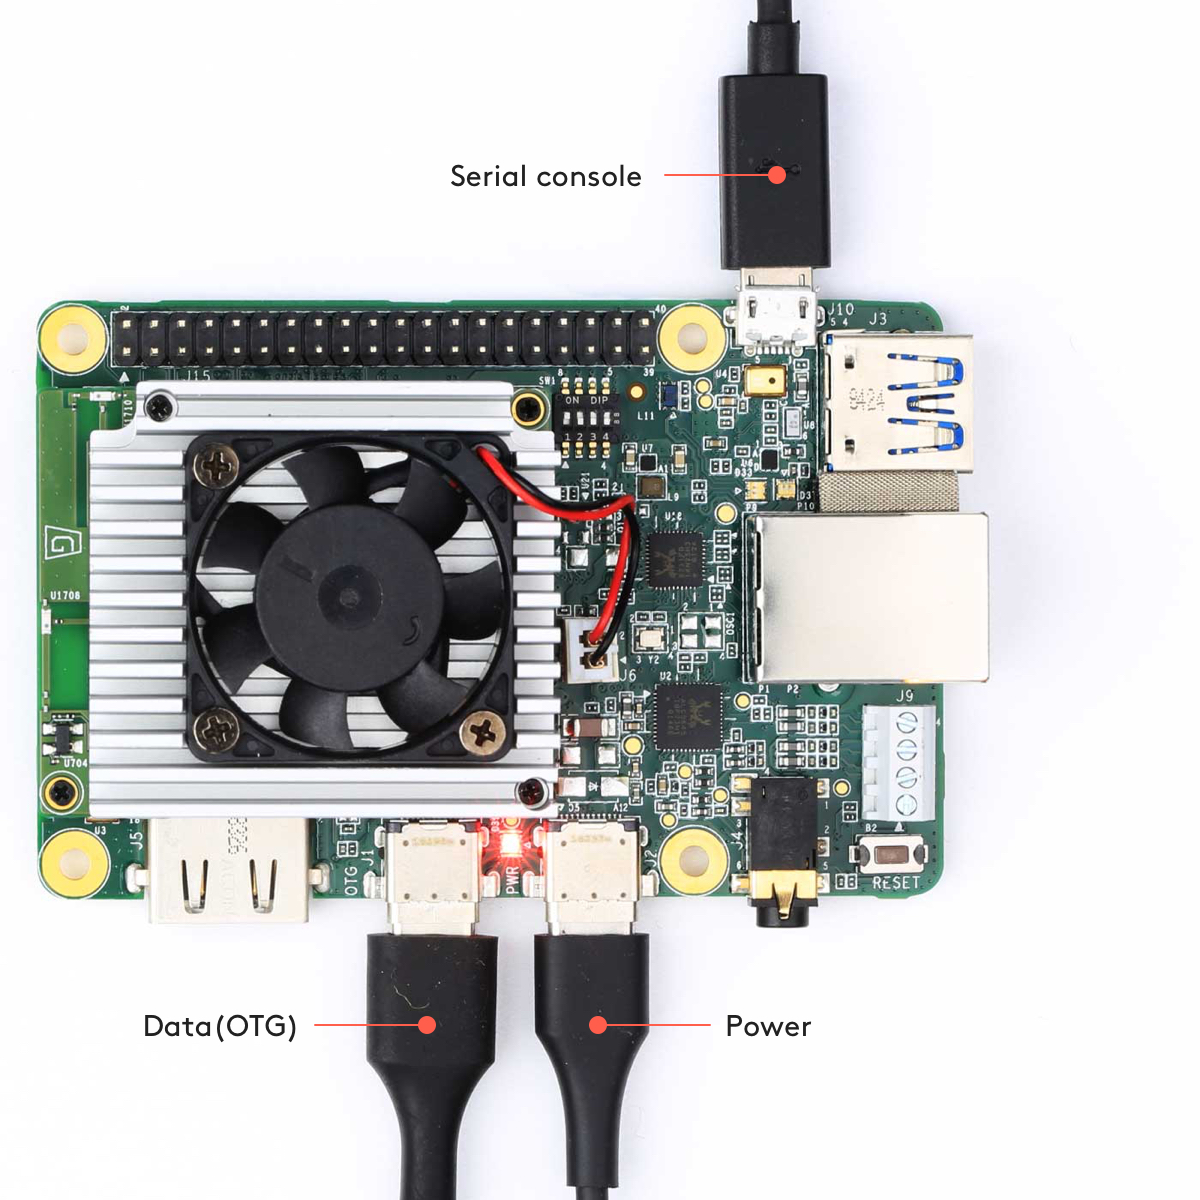
Figure 6. A USB-C data cable connected to the board (in addition to the serial and power cables) After a moment, you can verify that the board started in fastboot mode by running the following command from your connected host computer (requires
fastboot):fastboot devices
You should see a line printed like this:
1b0741d6f0609912 fastboot
-
Flash the image.
On your host computer, navigate into the unpacked system image directory (from step 2) and execute the flash script:
cd enterprise-eagle-20211117215217


bash flash.sh
When flashing is complete, your board will reboot. However, because you set the boot mode to SD card,
that's what it will do so you'll again see the u-boot prompt. So unplug the power and reset the boot
switches to eMMC mode:
| Boot mode | Switch 1 | Switch 2 | Switch 3 | Switch 4 |
|---|---|---|---|---|
| eMMC | ON | OFF | OFF | OFF |
Then boot the board again. When it's done booting, the console prompts you to login.
mendelPassword is
mendel
Once logged in, be sure to download other software updates with the following commands (be sure your board is online first):
sudo apt-get update

sudo apt-get dist-upgrade
Flash a new board
If you just unboxed your Dev Board, we recommend that you follow the get started guide, which shows how to flash the board using a microSD card. However, if you don't have a suitable microSD card, then you can instead manually flash a new board as follows.
1. Gather the requirements
Before you begin, collect the following hardware:
- A host computer running Linux or Mac
- Python 3 installed
- One USB-C power supply (2 A / 5 V), such as a phone charger
- One USB-C to USB-A cable
- One USB-micro-B to USB-A cable—be sure this cable supports data transfer (not just power)
You also need the following software tools on your host computer:
- A serial console program such as
screen,picocom, or PuTTY (among many others).Our instructions use
screenand it's available on Mac computers by default.If you're on Linux and don't already prefer another program, we suggest you install
screenas follows:sudo apt-get install screen
- The latest
fastboottool.On Linux, you can install as follows:
sudo apt-get install fastboot
For Mac, it's available from the Android SDK platform tools. This package has many tools, but you only need fastboot. So move that to a location in your
PATHenvironment variable, such as/Users/yourname/bin.Now verify it works:
fastboot --version
For Mac compatibility, the version must be 28.0.2 or higher.
Also configure your system to communicate with the board:
-
On Linux:
Run the following commands to add the udev rule required for fastboot:
sudo sh -c "echo 'SUBSYSTEM==\"usb\", ATTR{idVendor}==\"0525\", MODE=\"0664\", \
GROUP=\"plugdev\", TAG+=\"uaccess\"' >> /etc/udev/rules.d/65-edgetpu-board.rules"


sudo udevadm control --reload-rules && sudo udevadm trigger
Also make sure your Linux user account is in the
plugdevanddialoutsystem groups by running this command:sudo usermod -aG plugdev,dialout <username>Then reboot your computer for the new groups to take effect.
-
On Mac:
Caution: Before installing the following package, be sure you've applied all available macOS software updates. Otherwise, you might be blocked from installing due to system security that disables the Allow button in System Preferences.Install the CP210x USB to UART Bridge Virtual COM Port (VCP) driver for Mac.
2. Enable the correct boot mode
Before you begin the flashing procedure, verify the following:
- The board is completely unplugged (not powered and not connected to your computer).
- The boot mode switches are set to eMMC mode (see figure 7):
| Boot mode | Switch 1 | Switch 2 | Switch 3 | Switch 4 |
|---|---|---|---|---|
| eMMC | ON | OFF | OFF | OFF |
3: Initiate fastboot mode
If your Dev Board was manufactured before April 10, 2019, then you need to initiate fastboot on the board.
You can determine the manufactured date from the serial number etched onto the heat sink, as shown in figure 8.
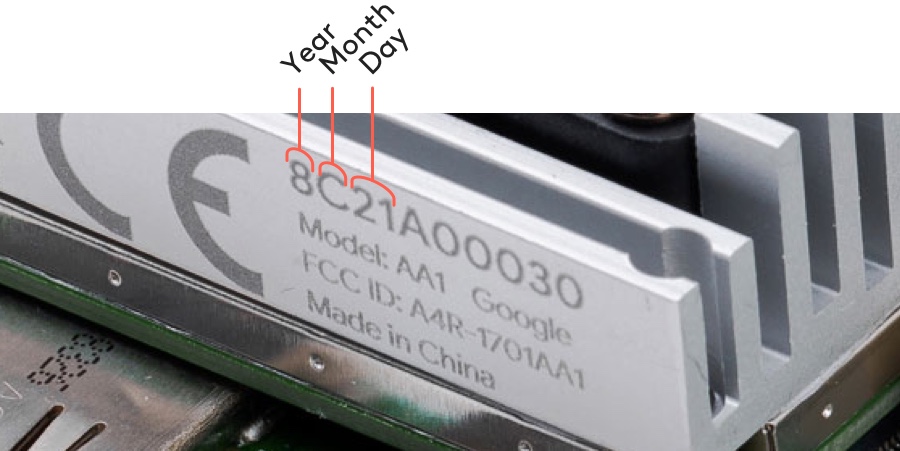
| Field | Description |
|---|---|
| Year | Last digit of the year of manufacture: 0 - 9 |
| Month | Month of manufacture: 1 to 9 (Jan to Sep), A (Oct), B (Nov), C (Dec) |
| Day | Day of manufacture: 01 to 31 (1st to 31st) |
If your serial number starts with "9410" or higher, then it was manufactured on April 10th, 2019, or later, so you can skip to execute the flash script (because your board automatically boots into fastboot mode).
But if the date reads "9409" or lower, then you need to perform the following steps to enable fastboot mode:
-
Connect the serial console cable.
Use your micro-B USB cable to connect your host computer to the serial console port on the board (see figure 9). The orange and green LEDs on the board should illuminate.
Note: The board should not be powered on yet.
Figure 9. A micro-B USB cable connected to the serial console port -
Initiate the serial console.
Open a terminal on your host computer and start the serial console as follows:
-
On Linux:
Determine the device filename for the serial connection by running this command on your Linux computer:
dmesg | grep ttyUSB
You should see two results such as this:
[ 6437.706335] usb 2-13.1: cp210x converter now attached to ttyUSB0
[ 6437.708049] usb 2-13.1: cp210x converter now attached to ttyUSB1
If you don't see results like this, double-check your USB cable.
Then use the name of the first filename listed as a
cp210x converterto open the serial console connection (this example usesttyUSB0as shown from above):screen /dev/ttyUSB0 115200
Help!If you see
[screen is terminating], it might also be due to the above missing groups, or there's something else wrong withscreen—ensure allscreensessions are closed (typescreen -lsto see open sessions), unplug the USB cable from the Dev Board, and then try again. -
On Mac:
First, verify the board is visible by running this command:
ls /dev/cu*
You should see
/dev/cu.SLAB_USBtoUARTlisted. If not, either there's a problem with your USB cable or the driver is not loaded. You can load the driver withsudo kextload /Library/Extensions/SiLabsUSBDriver.kextand then go to the system Security & Privacy preferences and click Allow. You also might need reboot your computer.Then connect with this command:
screen /dev/cu.SLAB_USBtoUART 115200
If this does not connect, check the
ls /dev/cu*output again—you might need to instead use the device name with a number at the end.
The prompt should disappear and your terminal should become completely blank. That's expected, because you've established a connection but the board is not turned on yet.
-
-
Power the board.
Plug in your 2 - 3 A power cable to the USB-C port labeled "PWR" (see figure 10).
Caution: Do not attempt to power the board by connecting it to your computer.
Figure 10. A USB-C power cable connected to the board (in addition to the serial cable) The board's red LED will illuminate and the fan might turn on.
Help! If you still don't see anything in the serial console screen, press Enter.Your serial console (the
screenterminal) should arrive at theu-bootprompt. You should see a "Welcome" message that tells you to visit g.co/coral/setup, which brings you to this page. So you're all good; you can continue.Note: If you instead see a long stream of messages, followed by a login prompt, then your board is already flashed with a system image. You can either disconnect the serial console and connect to the shell with MDT or if you still want to reflash the board, then instead read flash a new system image. -
Start fastboot.
In your serial console's
u-bootprompt, execute the following:fastboot 0
The cursor should simply move to the next line. Fastboot is now waiting for the host to begin flashing a system image.
-
Disconnect the serial console.
You won't need the serial console connection anymore, so you can close the terminal and remove the micro-B USB cable.
4: Execute the flash script
Now you're ready to flash the board.
-
Connect the USB-C cable.
Use your USB-C cable to connect your host computer to the USB-C data port labeled "OTG" on the Dev Board. (If you skipped the above procedure to initiate fastboot, then you also need to plug in your 2 - 3A power cable to the USB-C port labeled "PWR" and wait a few moments for the board to power on.)
Figure 11. A USB-C data cable and power cable connected to the board -
Verify fastboot sees your device.
Open a new terminal on your host computer and execute the following command:
fastboot devices
You should see a line printed like this (your numbers will be different):
1b0741d6f0609912 fastboot
If you don't see anything printed, be sure you have the latest version of
fastboot(as per the requirements above). If you recently updated fastboot but it's still blank, then repeat the steps to initiate fastboot mode. -
Download and flash the system image.
From the same terminal, execute the following:
cd ~/Downloads


curl -O https://dl.google.com/coral/mendel/enterprise/enterprise-eagle-20211117215217.zip


unzip enterprise-eagle-20211117215217.zip \
&& cd enterprise-eagle-20211117215217


bash flash.sh
This starts the flashing process and you'll see various output.
It takes about 5 minutes for flashing to complete. When it's done, the board reboots and your terminal prompt returns to you.
Now you can continue with the Dev Board get started guide.
Is this content helpful?